

To enable the creation and publication of our first application, we have to install and configure our development environment.
Our environment consists of the installation of Eclipse Plus Plug-in Developer Tools Android (ADT).
The ADT is simply a plug-in installed on Eclipse to develop applications for Android. The SDK will provide tools in our development environment as resources to accomplish the development, testing, debugging, debug, emulator and packaging of Android applications.
ADT is Open Source and available for the major operating system platforms.
We can to download the SDK on the site Android Developer.
To download the SDK would:
- Eclipse + ADT Plug-in
- Android SDK Tools
- Android Platform-tools
- The latest version of the Android platform
However as will be our first iteration of Android, it is good to present the classic way, with download the Eclipse IDE, plus the ADT and SDK available at the site Android Developer.

After performing the download, we will check if Java is installed on our machine, where we will set up our development environment.
Windows:
In the Console type java -version, the version of Java installed on your Windows will appear on the console.
Linux:
In Terminal type $ java -version, the version of Java installed on your Linux will appear on the terminal.
Mac:
Navigate to System Preferences, click the icon Java. The Control Panel’s Java will open where you will have access to the version of Java and its updates. If you can not find the icon Java in System Preferences, it is because he is not installed on your Mac .
After we verify the existence of installing Java on our machine, we run the Eclipse.
Run? But not installed the Eclipse yet!
The Eclipse IDE does not need to be installed on your your machine. Choose a reliable place to store the extracted contents of the download, after that create a shortcut to the executable file in an easily accessible place, such as desktop for example.


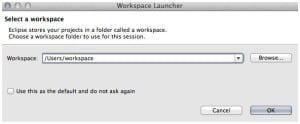
Run the Eclipse at the start you must specify or create a workspace, we will create a workspace in a directory, preferably in a location that you remember later. This workspace will contain all developed applications, when used / chosen to work with this workspace. So it is important to know the location of the directory. Click Browser to point to your workspace, then click OK.

Wait loading the Eclipse.


After loading, the Eclipse will start. This is the first screen to be displayed, Welcome.


Close the tab Welcome, the next screen is our development environment for applications Java. We must now configure it to develop applications for Android platform.
After download the ADT on the site Android Developer, we will install the plug-in in Eclipse. In Eclipse, navigate to the menu Help> Install New Software.


The this screen, Available Software.


Here we can perform the Plug-in installation in Eclipse IDE .
Click Add, now you have to point to the file Zippered the ADT, which you have downloaded at the site Android Developer. No need to unzip the file, you can point directly to the file Zippered. Remember to give a name to our Plug-in, in this case put the name of ADT. Then just click OK.


Those are the plug-ins aimed at installation. Select all and then click Next.


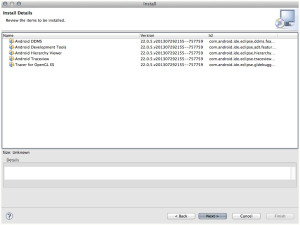
Wait loading, soon to see this screen, Install Details. Then click Next.
On the next screen you must accept the license terms for installation of plug-ins, Review Licenses. Check the I accept the terms of the license agreements. Then click Finish.

It may be that during the installation, a message is displayed, Security Warning, stating that the authenticity and validity of this software can not be established. Click OK, if it happens.


Wait for the installation of plug-ins, then a message will be displayed requesting the restart of the IDE, click Yes.

After the plug-in installation ADT in Eclipse is finished. Wait for the IDE is restarted to give continuity to the development environment configuration.
Now let’s start the installation tool SDK. In Eclipse, navigates up the menu Eclipse> Preferences.


Click Browser and navigate to the folder SDK, which conducted the download. Recalling that should point to the folder SDK, that is, it must be unpacked. Then click Apply, and Android versions will be displayed.
We perform download the SDK directly on the site Android Developer, he always has the latest version of Android.


Click OK and then already we have our development environment one step closer to being fully configured.
What remains now is the creation of our emulator, so we can perform deploy our application.
In Eclipse,![]()


Note that we have no emulator created, however, by clicking Device Definitios, we will have access to a Emulators list already configured, waiting for you.

Select the setting you want, in our case we select Galaxy Nexus by Google. Select and click Create AVD. In the next step we have access selected emulator settings. We should only inform the Android version of our emulator.


Click OK. There, our emulator was generated based on the settings you selected. Now to start it, just select it and click Start.


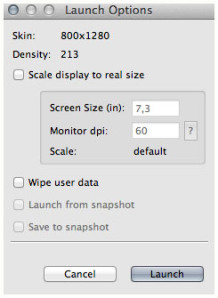
The screen Launch Options will be displayed, if you want to alter the resolution of our emulator. Click Launch.

Wait our load emulator, it may take a few minutes. Depending on the configuration of your machine this time may be longer and the emulator may hang.


After a few minutes our emulator is loaded.


This was the standard emulator, pre loaded available for our installation. Now let’s create our zero Emulator.
In Eclipse,![]()


Make sure we have the flap Android Virtual Devices selected
Now who will include information on the emulator settings is you. Enter a name for your new emulator, one device (device), Target (Android version), size SD Card, finally click OK.


There, our emulator was generated based on the settings you selected. If you enter any incorrect value or configuration is not valid, the IDE will not allow you to create the emulator. Emulator follow our list.

The emulator simulates an Android device, which can carry and deploy debuge of our applications. Its advantage is that we can simulate N combinations of Android devices, which helps us a lot, because today we have several Android devices, with various shapes, sizes and versions. However be working with the emulator requires a higher processing power of your machine.
What can we do?
The Eclipse IDE, with the Plug-in ADT plus the resources SDK, allows you to run your application directly on your Android device connected via USB on your machine.
In Eclipse navigate over an existing Android project and click the right button> Run As> Android Application.


The screen Android Device Chooser will be displayed, listing the valid devices connected to your machine.

If you do not find your device in list, make sure it is correctly connected to your machine via USB. Also make sure your device is configured to accept USB Debugging. To check on your device, navigate to the icon Settings>Development, check the USB debugging. Enabling USB Debugging varies with the Android version of each device.
In addition to these settings you must install the device Manufacturer Driver on your machine, the OEM Driver.
Well, with this we come to the end of another post, we hope to have helped to introduce some knowledge about Android in this post.
Useful links to curiosities, information, downloads and more:
Eclipse: http://www.eclipse.org/downloads/
SDK and ADT: https://developer.android.com/studio/index.html
Page directly SDK: http://developer.android.com/sdk/index
Direct page ADT: http://developer.android.com/tools/sdk/eclipse-adt.html
Java JDK: http://www.oracle.com/technetwork/pt/java/javase/downloads/
Linux: http://pt.wikipedia.org/wiki/Linux
Open Source: http://opensource.org/
Driver OEM: http://developer.android.com/tools/extras/oem-usb.html
Android Developer: http://developer.android.com/
Here’s a link to Driver OEM:
HTC: http://www.htc.com
Lenovo: http://developer.lenovomm.com/developer/download.jsp
LGE: http://www.lg.com/us/mobile-phones/mobile-support/mobile-lg-mobile-phone-support.jsp
Motorola: http://developer.motorola.com/docstools/USB_Drivers/
Samsung: http://www.samsung.com/us/support/downloads
Sony Mobile: http://developer.sonymobile.com/downloads/drivers/
Toshiba: http://support.toshiba.com/sscontent?docId=4001814
ZTE: http://support.zte.com.cn/support/news/NewsDetail.aspx?newsId=1000442
-

-

-

-

-

-

-

-

