This is a complete guide based on all possible methods to enter Samsung Galaxy S9/ S9 Plus recovery mode. Irrespective of the fact, whether you’re on stock recovery, or a custom, these methods remain the same. Most of the manufacturers ship their phones with this mode inbuilt, and keep it accessible. Samsung does the same, and keep the recovery mode accessible easily. The recovery mode is very essential part of an Android phone. In basics, the recovery mode is meant to be accessed to unzip some certain features that we can’t access directly. Since, you have one of these; Samsung Galaxy S9/ S9 Plus, you must know about this mode, and how to enter into it.
Reaching to recovery mode on Samsung Galaxy S9/ S9 Plus is almost identical as other Samsung’s smartphones. So, accessing the recovery mode, it’s not that much tough. Though, it depends upon the situations. In this tutorial, we are going to learn different methods to get into the recovery options on these smartphones. The recovery mode majorly offers maintenance related options. And sometimes they become very important. Since, this mode offers many maintenance friendly options, you know how to use them to maintain your device.
Many smartphones do not come with this mode. For such handsets, we have to first install a custom recovery, and then only, we can access those features. Thankfully, Samsung Galaxy S9 and S9 Plus come with a stock recovery. Although, its functionalities can be extended with stock recovery like TWRP. Since, both the phones are very popular, very soon, the developer would bring a custom recovery for them. And then you have it installed on your device.
Basically, the recovery mode offers extensive features to maintain the Android phones. This panel comes inbuilt in most of the Android phones. Using this mode, we can easily flash firmwares, updates, third-party mods, perform wipe-out, factory reset, and do much more. Most importantly, this mode lets you backup the firmware/Rom of your phone, and vice versa.
In this tutorial, we are going to discuss widely used method to access the recovery mode. Also, we will learn about the recovery mode options, and their intentions. So, let’s get started with the process:
How to Enter Recovery Mode on Samsung Galaxy S9/ S9 Plus
We are going to cover three methods that help to get into the recovery mode. The very first is done through physical buttons. And other two includes little technical things.
Let’s get started, and learn how to boot into recovery mode on the Samsung Galaxy S9 and S9 Plus:
1. Through physical keys:
Most of the Android users use this method to access the recovery mode. It includes a key pattern that takes the user to this mode.
Here is how it works:
- Turn off your phone completely.
- Now press and hold Power + Volume Up + Bixby buttons for a few seconds all together.
- After a few seconds, you’ll see a blue screen with few messages, just ignore it, keep pressing the buttons.
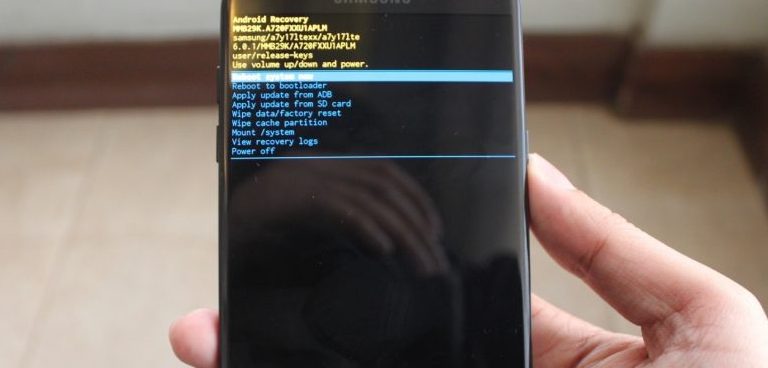
- Soon, you’ll see an another blue screen that will have a big “!” logo, and displays a text “No command” like below:

- Now, release the buttons, and it will automatically redirect you to a recovery mode menu:
- To exit the recovery mode, select Reboot system now.

That’s how we generally access the recovery mode. This method works most of the time until all the keys are working fine.
We have two more methods to discuss here. If you see that above method doesn’t work for you, go ahead and try the next method.
2. Using ADB commands
The ADB stands for Android Debugging tools that merely meant to be used by developers. However, we can use this utility to enter the recovery mode on Android phones like Samsung Galaxy S9 and S9 Plus.
You just need to make sure that you have a Windows based PC, and have installed the device drivers on it. Get the Samsung USB drivers from here, and install them on your PC.
Here is how you can boot into recovery mode on the Samsung Galaxy S9 and S9 Plus using the ADB commands:
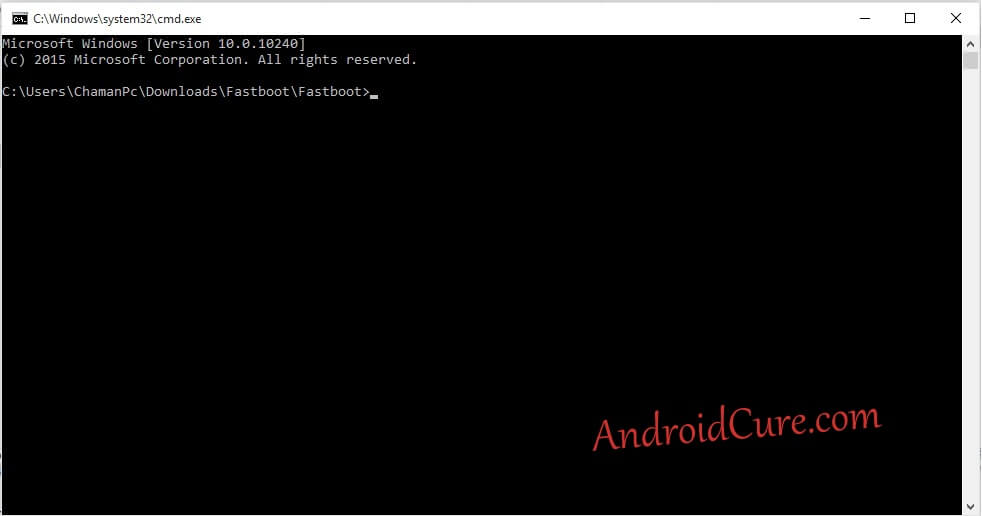
- Download, and extract the fastboot tool from here, and extract its content on your PC.
- From the exacted folder, click twice on run.bat file to run the Adb fastboot Tool. It looks like:
- Connect your phone to PC using the USB cable.
- Now, enter the following command:
- adb reboot recovery
- That will reboot your phone, and take your recovery mode.

Again, you’ll land to the recovery mode menu. There you are free to use those options to cure your smart phone.
This method comes very useful when physical keys won’t work. Though, it is a more developer friendly method, but it works all the time.
3. Using a dedicated application
This method requires root access. So, to make booting into the recovery mode, and others easier, you must acquire a root access on your phone. Once you get the root access, there are tons of root applications that you can use to enhance your user experience. (Also see: list of best root applications to improve performance)


For this purpose, we have Quick Reboot [ROOT] application that does this work flawlessly. It expands the booting section, and serves extended boot options.
This application is completely free to download, and use. You can get this application from Google Playstore.
How to use Recovery Mode options:
Here are some recovery options that you must aware yourself while using the recovery mode on Samsung Galaxy S9/or S9 Plus:
- Reboot system now – This option is very critical since it helps to exit from the recovery mode. Once you get into the recovery mode, to exit it, you need to use this option.
- Reboot to bootloader – The bootloader mode helps to update/flash firmware, custom recovery, and mods using the ADB Tool (Android Debugging). Most likely, an ordinary user won’t use this option throughout the whole time. This option is meant for developers, to test, and bring better stuff for our smartphones.
- Apply update from ADB – Again, this option is related to ADB Tool. And it works while we connect our phone ADB tool. It works with this tool only.
- Apply pdate from SD card – This is very option widely used by Android users. Through this option, you can update your phone with the latest firmware. Or, flash a custom Rom on your phone. Sometimes it happens that we keep on waiting for an update, but it takes so long for some regions. Instead, just download the Update Zip file using the Google, and flash it manually this option. In that way, you can manually update your phone.
- Wipe data/factory reset – This option helps you to factory reset your phone. Sometimes it happens that our phone stops functioning, or behaves unnaturally. In such cases, factory reset works well. Basically, it deletes all the downloaded stuff, and revert all the changes that you’ve made. And in the last, turns your phone into a factory fresh piece.
- Wipe cache partition – By wiping out the cache partitions, we can regain the lost performance, and fix many errors on an Android phone. Basically, it deletes all the cache files created by operating system, and application.
It frees good amount of memory.
I hope that now you have all the important information about the recovery mode, and its options. Now, you can use them to maintain your phone.
That ends our tutorial here on how to enter recovery mode on Samsung Galaxy S9/ S9 Plus and about its options. We hope that our readers would use this mode to enhance their experience. Don’t forget to share your comments, and thoughts about this tutorial.
-

-

-

-

-

-

-

-