iPhone is a very complex smartphone, it has a lot of restrictions that make it very hard for users to manage their storage. No slot for a memory card just makes the matters worse. We all know how hard it is to import and export data from our iPhone to a computer or vice versa.
Well, dr.fone is here to save the day for you. Because we all know that even if you have the iPhone variant that offers the most storage, we will run out of space at some point. At this point, you can delete your memorable media files, or you could use dr.fone to export the data to your computer and continue using your iPhone with loads of free space. Or in case you get into the trouble and loose your your files, this iPhone Data Recovery Mac tool should help to get things done.
Fortunately, dr.fone gets the job done without requiring you to jailbreak your iPhone. All you need for this process is a computer with dr.fone installed on it. (you can download the demo version of dr.fone from here) You will also need a lightning cable to connect your iOS device to your computer.
Importing media files from your computer to an iOS device:
Step 1: Launch dr.fone and connect your iOS device to the computer:
Launch dr.fone software on your computer and select “Transfer” from the array of options displayed on the main screen.

Now connect your iPhone to the computer using the lightening cable. You should see a “Trust This Computer” alert on your iOS device, tap on “Trust”.
Step 2: Select and Import media files from the computer to iOS device:
Once your iOS device is connected, dr.fone will be able to sense the connection and move you to the next screen.

You should see a number of tabs on the top of the dr.fone software. Select any one of the options that include “Music”, “Videos”, and “Photos”. Once a tab is selected you should be able to see all the related media files present on your device.

We will use the Music tab for this demonstration. The steps are similar for each type of files.
Step 3: Import media file/folder to iOS:
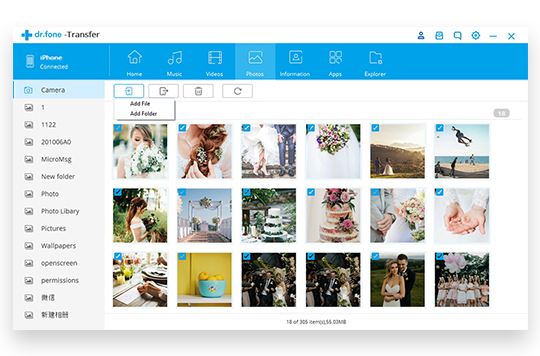
In order to import files from your computer to your iOS device, hover your cursor over the “Add” button.
You should see two options: “Add Files” and “Add Folders”. Depending on your requirement, click on either of the two options, browse to the location in your computer where the files are stored, then click “Add File” option to send them to the iOS device.

If you want to import all the music files in a specific folder, then choose the “Add Folder” option and browse to the folder on your computer.

Export media files from your iOS device to your computer:
Final Step: Select and export files to your computer:
In the file management window seen on dr.fone, click on the checkboxes to select the files that you want to move to your computer. Once you have selected all the required files, click on “Export” button, then click on “Export to PC” from the options that pop up. If you want to export music files to iTunes library, you can find that option too.
![]()
Keep in mind that all iTunes U, podcasts, ringtones, and audiobooks will be available on the same screen.
After you click on “Export to PC” option, you will be prompted with a browsing window. Browse to the location on your computer where you want to save the files coming from your iOS device, and click ok.
The transfer should start and would probably take a few minutes depending on the size of the files.
![]()
And you are all done! Can’t believe how easy that was, right? Dr.fone is an excellent software to manage data recovery and import/export from and to your iPhone and your computer. Visit dr.fone’s website to check out all the other features offered by the software.