
Motorola Moto X Play is good deal when it comes to buy best medium budget smart phone and compared to other alternatives in same price points, it is almost better in all aspects. When it comes to customization, probably the most appropriate step is root the handset first and then install third-party apps and roms, and it sometimes leads to bricked condition or damages operating system’s core files so you end up with bricked phone.
Well there is no need to worry until your device is physically damaged. If you have bricked your Moto X Play, then probably the way to make it work again would be downgrading it to stock firmware or in simple term, you’ll need to flash stock firmware on your device to restore it back.
Also see:
- How to speed up Motorola devices
- How to root Moto X Play
- Remove Bootloader Unlocked Warning on Motorola devices
As initially Moto X Play launched with Android Lollipop operating system, we’ll be installing Android Lollipop operating system to repair or unbrick it. This tutorial is help in following conditions:
- Bricked condition – phone is not working or starting up after installing third-party rom, mod etc.
- Boot loop – Firstly you can to try simple soft reset (perform wipe out under recovery option), if it does not work then you should probably use this guide.
- Force close – Your facing force close on most of the apps
- You can install this stock firmware to prepare your device to install custom rom (some Roms requires stock firmware as base).
Remember :- Installing or downgrading device to stock firmware will wipe out the complete device and all the files stored under the device will be deleted and it cannot be undone!
If you can save the files, then do it for your convenience. Also you can follow our – Android backup guide.
Downloads
→Download the firmware file from here. Download the firmware file with checking your →model number and country.
Note:- Download the firmware file specific to your device. Verify the model number and download the latest available file.
→Download the Motorola Moto X Play PC drivers from here. Install these drivers to your PC, it is very necessary so your device can be detected on PC.
→Download the minimal Adb fastboot Tool (tool to flash this stock firmware) from here. Extract it to your PC and remember the location.
Note:- After you download the firmware zip file, make sure to extract stock firmware in the ADB fastboot folder.
How to unbrick Moto X Play using Stock Firmware
- Turn off the device and wait 3-5 seconds.
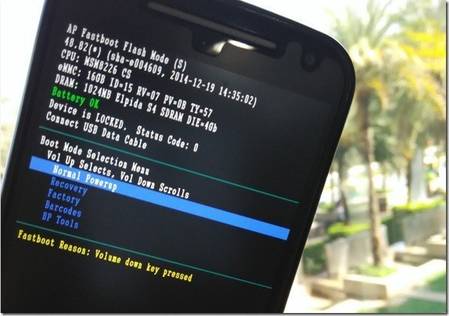
- Now, press and hold Volume down and power buttons simultaneously to get it started in Fastboot mode. You’ll see the following screen,
- On PC, run the “Run Me.bat” file from extracted Adb fastboot Tool. The command prompt will appear.
- Now connect your handset to your PC using USB cable.
- Now Type the following commands one by one on it,
astboot flash partition gpt.bin
fastboot flash bootloader bootloader.img
fastboot flash logo logo.bin
fastboot flash boot boot.img
fastboot flash recovery recovery.img
fastboot flash system system.img_sparsechunk.0
fastboot flash system system.img_sparsechunk.1
fastboot flash system system.img_sparsechunk.2
fastboot flash system system.img_sparsechunk.3
fastboot flash system system.img_sparsechunk.4
fastboot flash system system.img_sparsechunk.5
fastboot flash system system.img_sparsechunk.6
fastboot flash system system.img_sparsechunk.7
fastboot flash modem NON-HLOS.bin
fastboot erase modemst1
fastboot erase modemst2
fastboot flash fsg fsg.mbn
fastboot erase cache
fastboot erase userdata
fastboot reboot - Disconnect your phone from PC.

All done! You’ve successfully downgraded your handset, Moto X Play using Stock Firmware. The first boot may take little time to get up, don’t get worried yourself, it is completely normal and you’ll be at home screen soon.
Also we recommend you to check all the file names mentioned in above commands with respective file in firmware folder.Don’t forget to share your this post with your friends if it helps you in any way!
-
![15 Best Free Microsoft Excel Alternatives [2024]](https://androidcure.com/wp-content/uploads/2020/04/Top-Microsoft-Excel-Alternatives-390x220.jpg)
-

-

-

-

-

-

-