
Sometimes it happen with we eventually end-up having our device bricked. Generally it happens when we try custom Roms, rooting, etc. Irrespective of device, whether you’re having an iPhone or flagship killer like Samsung Galaxy S8/S8+, it may happen to you too. If something like that happened to your smartphone, we have this guide for you. In this tutorial, we gonna help you to unbrick / repair the Samsung Galaxy S8 / S8+ by flashing the stock firmware onto it.
Sometime it happens that our smartphone starts to behave unnaturally. It may get stuck onto a boot screen, or won’t get started at all. App crashes, boot-loops, unresponsiveness, i.e these issues are common. To get rid of such issues instantly, flashing a stock firmware would be the ideal way. Or trying resets may work. In this guide, we also mention some methods to reset the handset, If you’ve been facing such issues on your Samsung Galaxy S8/S8+, this guide will surely help you in the best manner.
Before we get onto the steps to flash stock firmware on Samsung Galaxy S8/S8+, it would be a good check if existing issue can be rectified thought resets (soft/hard resets). We gonna discuss these resets, and when /how to perform them in this tutorial. Without much more talk, lets get onto the ground, and play it simple.
How to Reset Samsung Galaxy S8/S8+
Basically there two methods. One is factory reset, and the second one is hard reset. Each of them have their own benefits, and can help to take care of many issues. Let’s discuss the very first one.
1# Factory Reset
It is helpful in many minor issues such as app crashes, out of storage, low-performance, etc. This reset will wipe out the device, and take it down to its very native state, factory fresh state. Facing performance issues on the Samsung Galaxy S8 or S8 Plus, check out below tutorial to get the best performance:
If you see something similar on your phone, it is the time reset factory it.
-How to
- Tap on Settings
- Then Tap on Back up and reset
- Hit the Factory data reset option
- Perform the Reset.
That’s it. It may take a few minutes to reset the handset thoroughly. It should remove the minor issues instantly.
Note: Before you perform resets, we recommend to backup your device appropriately. Follow our below guides to backup your phone.
Also See:
2# Hard Reset
It takes reset to another level. It includes the use of recovery mode, and there we clear device completely. Noteworthy, That won’t hurt the operating system. Instead, it cleans the internal memory of the device completely.
It helps to cutoff major issues like boot-loops, stability, etc., If you find that factory reset does not work, then go ahead and give this a try.
-How to
- Boot into →recovery mode on Samsung Galaxy S8 /S8+
- Under recovery mode, perform following actions: Wipe data/factory reset
- Reboot the device.
Task accomplished. This is how one perform the hard reset on these smartphones. Further, we gonna serves you with the last, and absolute solution.
Flashing stock firmware works most of the time, and it restores the device to it’s native operating system. That means, it will wipe out entire device’s memories.
Once that performed, it can’t be undone. Make sure to keep a backup before you proceed any further or if you intend to flash stock firmware on your Samsung Galaxy S8 /S8+.
How to Unbrick Samsung Galaxy S8/S8+ using stock firmware
The process is very simple. You need to follow the steps exactly that we mention them here. The success rate is quite high.
- Download the Odin Flashing tool from →here. Extract the .Zip file to your Windows Laptop/Desktop. Under the extracted folder, look for Odin3 v3.12.7.exe. We’ll be using this tool to flash the firmware onto these phones.
- Download the Stock firmware for Samsung Galaxy S8/S8+ from →here according to your model number. To locate the model number, go to Settings->About Phone->Model number. Make sure to download correct firmware file, and extract it into your Laptop/Desktop.
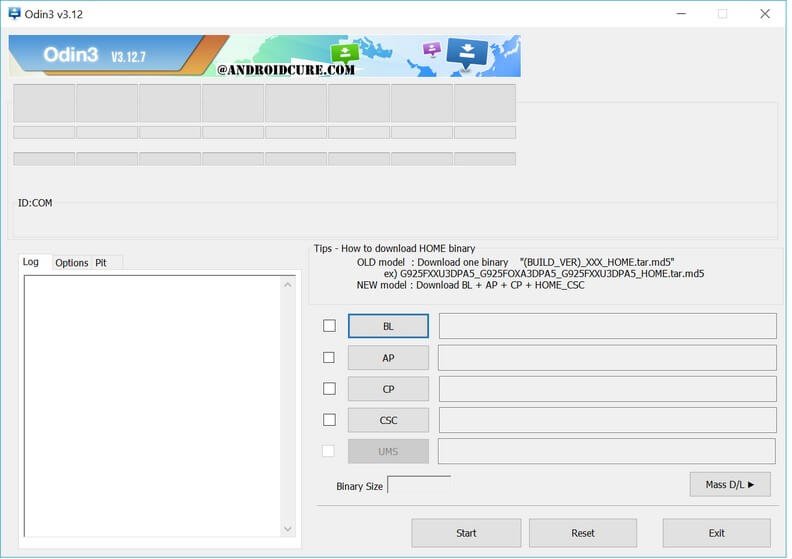
- Run the Odin program. Tap twice on Odin3 v3.12.7.exe file that you’ve extracted from the .Zip file. The Odin software looks like below:
- Now put your phone into Download Mode:
- Turn off the phone.
- Press and hold Bixby + Power + Volume Down buttons.
- Release them once you see Warning! Or it gets into Download Mode.
- Now connect your to your Laptop/Desktop using a USB cable. Make sure that you’ve the proper device driver installed on your system. If you have not, get’em →here.
- Once you connect the handset, the ID: COM section under Odin will turn to Blue color. That means, your device it ready for flashing purpose. If you don’t see such thing, therefore go ahead and install the device drivers again, and restart your system.
- Now Select “AP” and then find and locate .md5 file from the extracted folder of firmware. Do not make any other changes.
- Make sure that “Re-partition” box is unchecked.
- Click on “Start” button to execute the process and let it complete. Once finished, a PASS! message will appear.

Now disconnect your phone. Sometime it takes about 5-10 minutes to carry out the task. Don’t get panic as it happens naturally.
The phone should now boot you to its native home-screen. Put your Google Account details, settings to get going with it.
That ends our tutorial here about flashing stock firmware on Samsung Galaxy S8/S8+. Don’t forget to share your pity experiences with this smartphone. Take full advantage of this device, and take gaming to PSP level.
If you’re anything like me, you’ll love to play the most-fascinating titles like God of War, Dragon Ball Z, etc on it. Follow below guides to make happen:
Keep a sync with us for most useful tutorials, news, and hacks!
-

-

-

-

-

-

-

-

