With the advent of Smartphones in the world of telecommunication, many additional features have also got leap of advancement as they all are incorporated within a single Smartphone device. Images or Photos are one of them. Smartphones have facilitated the ease of taking immediate snaps or images without the need of any conventional digicam or camera. Thus your android device is a hub of innumerable photos.
This number of photos requires adequate security and if you are about to sell out your device to someone else, then they definitely need to be wiped out of your device for the sake of your privacy. In case they fall in the wrong hands, they can be misused or exploited against your wishes.
Thus the solutions described in this article, are all aimed at deleting images for your Android , Keep reading to know the solutions in details:
Solution #1: Erase Images Manually
Here in this section, we would utilize the in-built deletion feature of the Smartphone device to carry out the job. Though it is time-consuming method, but it is a secured way to delete your images. Read the steps below to know the method in detail:
Step 1. Turn on your Phone and open the Gallery App.
Step 2. Tap on images and continue to press on them until a thread of images is created.
Step 3. Press on the “Trash” icon, from the above bar to delete the thread of images once and for all.
Step 4. Press “Delete All Images” option to verify the deletion process.

And that’s it! All your images will be wiped out of your device in an instant.
CONS:
- It will take more than the usual time in selecting the image one by one and then delete so it is a time consuming method.
- The erased images can be recovered by any expert hackers using certain data recovery tools.
Solution #2: Delete Images using Soft Reset
This section basically deals with the formatting of your device which in turn will erase everything off your device including the images.
The method is a bit old one to implement yet can work in case of emergencies, especially when you don’t have enough time to select and delete images on one by one basis like in the case of previous method. Now go through the directives outlines below in the following steps:
Step 1. Firstly Turn on your Smartphone.
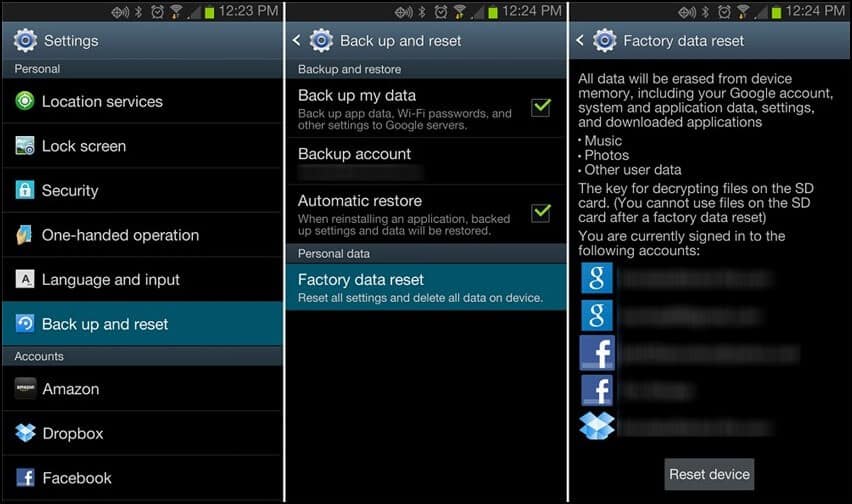
Step 2. Tap on “Menu” and launch the “Settings” menu.
Step 3. Go to the “Personal” section, tap on “Backup & Reset” option. Enter your PIN or Password if need be.
Step 4. Now press “Factory Data Reset”.
Step 5. On pressing “Factory Data Reset” you will be displayed a lot of information on the screen from which you have to tap “Reset device” and then “Delete Everything” option that turns up.
CONS:
- In addition to deleting your images, it will delete all your contact details as well which might prove to be problematic afterwards.
- The lost images can be restored using recovery tools.
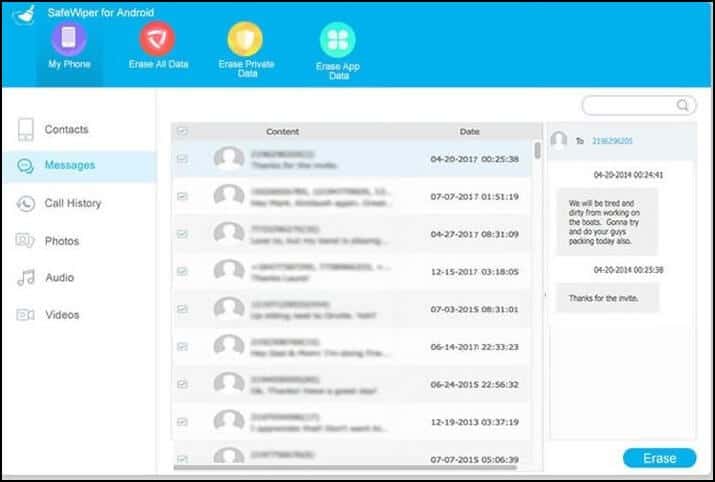
Solution #3: Erase Images using SafeWiper Software
SafeWiper is a wonderful data erasing tool which erases all kinds of data, be it contact details, media files, images, messages, apps, etc. but here as per our concern we would discuss only about the deletion of images only. Some of the important features of the tool are described below:
- The tool comes in three operation modes – “Erase All Data”; “Erase Private Data”; “Erase App Data”
- It erases data with 05 recovery possibility.
- It offers 24×7 technical support.
- No internet connection is required while deleting the images.
- The data lost cannot be recovered even by any expert hackers.
SafeWiper Working Procedure:
Step 1. Download the program file and install it accurately in a spare working computer of Windows or Mac OS since it is compatible with both of them.
Step 2. Open the tool with admin privileges and from the main UI screen, click on “Erase Private Data” option.

Step 3. Now connect your Smartphone to your computer and select “Settings”, then “Developers Option” and finally tap on “USB Debugging” option to enable the USB Debugging in your device.

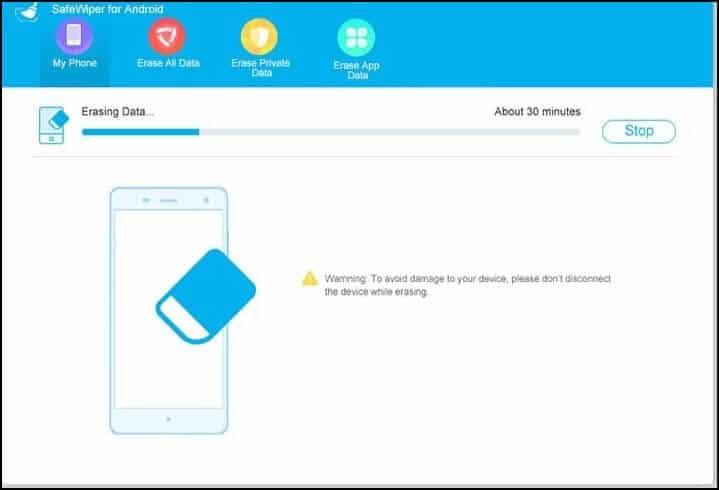
Step 4. The software will start scanning your device contents and will display all the data like a preview from which you can select which images you wish to delete. Click on “Erase” button from the bottom left corner of the screen to initiate the deletion process.
Step 5. If you wish to alter the security level of the tool’s deletion process, it would be best to choose the “Middle Level” option.

Step 6. Keep your device connected to the computer while the deletion process continues otherwise it might abort the process in the midway.
Lo! The problem is solved. Your images from the Smartphone are erased completely with no scope of future recovery thereby providing you the utmost security.
Conclusion:
Erasing images of your device is a noticeable demand which can’t be denied when you are handing over your precious device to someone else. Well there are several methods that can be applied to do the job, but if you are seeking assurance with 100% genuine result then you better stick to SafeWiper.
If you are interested in knowing more about the tool and many more relevant articles, visit our website to get daily updates.