
Actually, it is hard to believe that still, some developers are working to bring an amazing stuff for old-outdated phones. There is an unofficial Lineage OS build has appeared that supports Samsung Galaxy Ace 2 and most fascinating thing is that it is based on Android 8.1 Oreo firmware. This information is plenty enough to have this custom ROM installed on our device. In this tutorial, we help you to install the Lineage OS 15.1 On Galaxy Ace 2, an Android 8.1 Oreo based custom ROM. As per the available information, this build is quite stable, everything seems to work, and most probably the only way to upgrade the device latest Android software.
More than 5 years have passed since Galaxy Ace 2 was launched with Android 2.3 (Gingerbread). And eventually updated to 4.1.2 (Jelly Bean) Operating System through official support. But failed to receive further updates due to out-dated hardware specs. Surprisingly, the Android developers have ported the Lineage OS 15.1 firmware for this handset. If you’ve been looking to update your Samsung Galaxy Ace 2 to newer Android software, then currently this ROM would be the best choice. It is the latest ROM specifically developed for this handset.
The Lineage OS is custom firmware developed by third-party developers. It has no relation to Samsung or Google in any way. It is known for performance and stability. This custom ROM is based on Android 8.1 operating system and comes with many improvement tweaks. You can expect some major improvements in performance, battery life and of course in the user interface. The latest interface has many new features and customization options. However, since it is not an official built, you might experience some minor bugs or very least of them. We can expect these to be removed after future updates (if it happens so).
Overall, we highly recommend this custom ROM, for all Galaxy Ace 2 users seeking to update their phone. So far, this the only ROM that gets your Ace 2 updated to this Android version. In order to install this custom firmware, your phone must be using the custom recovery. To flash this ROM properly a custom recovery is required. We suggest installing TWRP recovery on your phone. That doesn’t take that much time. Install a custom recovery takes only a few minutes. To install the custom recovery, TWRP on your Samsung Galaxy Ace 2, download the recovery image from →here and follow the below tutorial to flash the recovery file:
If you’re done with installing a custom recovery on your phone, then we can move further. We also detail the risks and prerequisites implied in this process. Here are some important prerequisites that must discuss and understand:
- This guide and custom firmware are meant to be used on Samsung Galaxy Ace 2. One shouldn’t use it on other smartphones. Its consequences could brick your phone. Check your device model number by tapping Settings->About Phone->Model Number.
- As discussed above, a custom recovery like TWRP is required to flash this firmware. Otherwise, things will not go as we want. You might not able to flash this ROM successfully unless you have a custom recovery.
- The process goes through cleaning your device. That means the internal memory will get wiped OFF while we proceed with this process. So backup all the important stuff before you make a move. There are plenty of applications that help in creating a backup. You can use Samsung Smart Switch application to backup your Galaxy Ace 2 phone. That will make this process more safe and convenient.
- Since we are dealing with a custom firmware it will void the warranty terms. And I guess there won’t be any issue regarding the same. Most probably, the warranty of the device would have gone already.
- At last, do check the battery level of your phone. Charge your phone at least 50%. So it won’t die in the midst of the process.
There are the important things that you must read and keep in your mind while performing this action. Also, we suggest you back up your current firmware. It will be useful in case you find yourself disliking this custom ROM or face major issues with it.
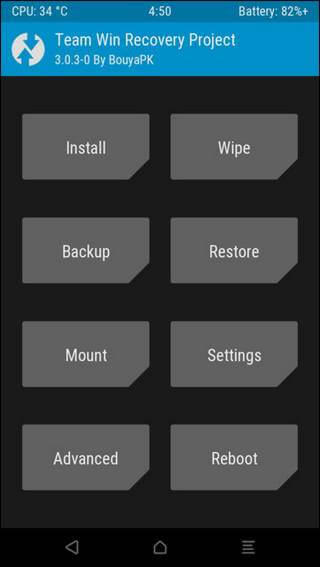
You can back up your current firmware through recovery mode. To back up, enter into the recovery mode ->Advanced Options->Back up. Make sure to store the backup on SD card instead of internal memory.
Now, you’re ready to update your Galaxy Ace 2 to latest Android 8.1 version.
How to install Android 8.1 Oreo based Lineage OS On Galaxy Ace 2
- Download the LineageOS 15.1 for Samsung Galaxy Ace 2 from →here. After downloading the file, transfer it to your memory card (SD card). Put it in the root directory of the memory card and remember the file name.
- Turn off your phone using the Power button.
- Now, boot into the recovery mode – press and hold Volume Up, Home, and Power buttons together. Release them once your phone vibrates or Samsung logo displays on the screen. You’re in recovery mode.
- Under the recovery menu perform, tap on ‘Wipe’ and perform this action. It will factory reset your phone and help to get a clean install.
- To install custom ROM, tap on Install option:

- Follow the on-screen instruction to flash the Rom file on Galaxy Ace 2.
- Once you’re done with flashing this custom firmware, tap on ‘Reboot’ button to exit this mode.
That will reboot your phone. For first boot attempt, your phone might take several minutes. It is completely Okay and it happens usually.
Very soon, it will take you to the setup screen, enter your Google account details to start using this device. Also, you can customize it right away for a custom user experience.
That’s all you gotta do to update your Samsung Galaxy Ace 2 to latest Android 8.1 firmware using LineageOS 15.1 ROM. That ends our tutorial here and we highly hope that readers would take full advantage of this custom build.
Don’t forget to share your thoughts and views below in the comment section. If find yourself struggling with any step, do let us know so we can help in a possible way. Stay connected with us for more useful content and stuff.