During the past few weeks I have reviewed several online app makers. For those who don’t know how to develop Android apps in Java (or any other language for that matter), app makers can be a great alternative to learning how to program. All of the tools I reviewed however focused heavily on online content based apps. We hope that our readers would like this review. Don’t forget to share your valuable thoughts with us. You’re most welcome to make comments.
MIT’s App Inventor 2 (AI) is quite a different beast from, say, Andromo or Appsbar. It was first developed by Google and released in 2010. On December 31, 2011 Google terminated the project. But the MIT Center for Mobile Learning adopted MIT App Inventor and the made it available again to the public in the first quarter of 2012.
To get started, you need to sign up with a Google account. If you don’t have a Google account (seriously, you don’t?) you will have to register one because there is no other way to sign up with App Inventor.
Before you can start building apps you must setup your computer and either setup your Android device of choice or an emulator to test your apps as you build them. When you first log in to the site you are immediately presented with the MIT App Inventor Designer interface: the fact that you have to do the above mentioned steps before you can start building an app isn’t obvious at all. A more prominently placed getting started guide would be helpful…
Setting up your computer involves downloading and installing some software. Working with MIT App Inventor , you use the Designer interface on the website, the Blocks Editor software that runs on your computer and either a real Android device connected to your computer or an emulator provided with the software.
The emulator looks similar to the one provided by the Android SDK but the screen is a little smaller. Interestingly, on my system the AI emulator responded a lot faster to inputs than the Android SDK emulator.
The complete setup and instructions are give by them and you can view them all here.
Also we’d love to share our list of emulators to test your apps, please visit →here to check our list.
Building an App
After completing the computer and phone/emulator setup it’s time to start building your first app. There are several tutorials that guide you through the process and showcase the possibilities AI offers.
The Designer
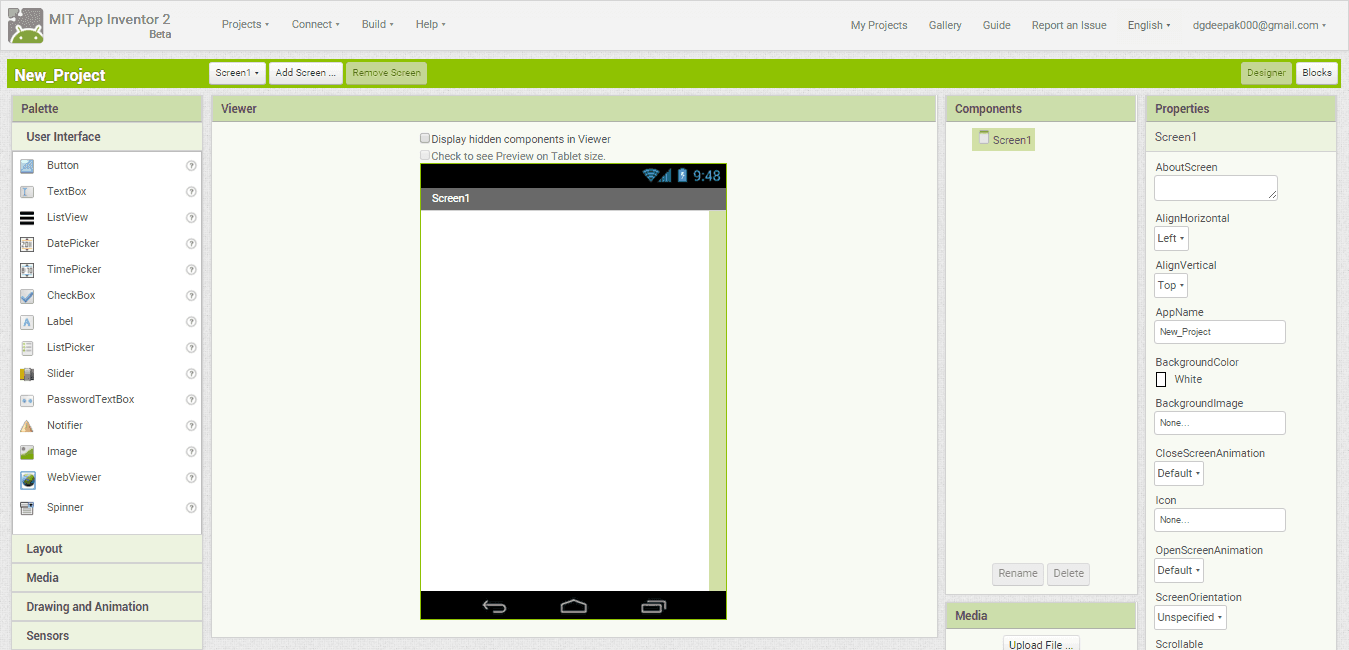
You start at the “New Projects Page” where you create and name a new app project. The Designer page is the interface for adding functional components to your app. This is done by simply dragging and dropping components from the left of the screen, the “Palette”, to the “Viewer” area in the middle. When adding components to the Viewer, they simultaneously appear in the “Components List” to the right of the Viewer.
The list of components is comprehensive and includes many options that aren’t available in other online app builders. Interesting examples are the Canvas for inputting touch data, the TinyDB database and three different Sensors.
To the right of the Components List is an area labelled “Properties” where you can edit the properties of the component that is currently selected. You can select components by clicking on them in either the Viewer or the Components List.
Building Blocks
Building the functionality for your app’s components is done in the Blocks Editor. After opening the Blocks Editor java file on your computer you are presented with an empty screen. First you must start a new emulator or make a connection with your Android device (connected to your computer) so you have a means of displaying your project. After choosing either option, you will see the app appear on the screen.
During the process of adding/changing components and functionality, the app is dynamically updated on your device or the emulator… impressive!
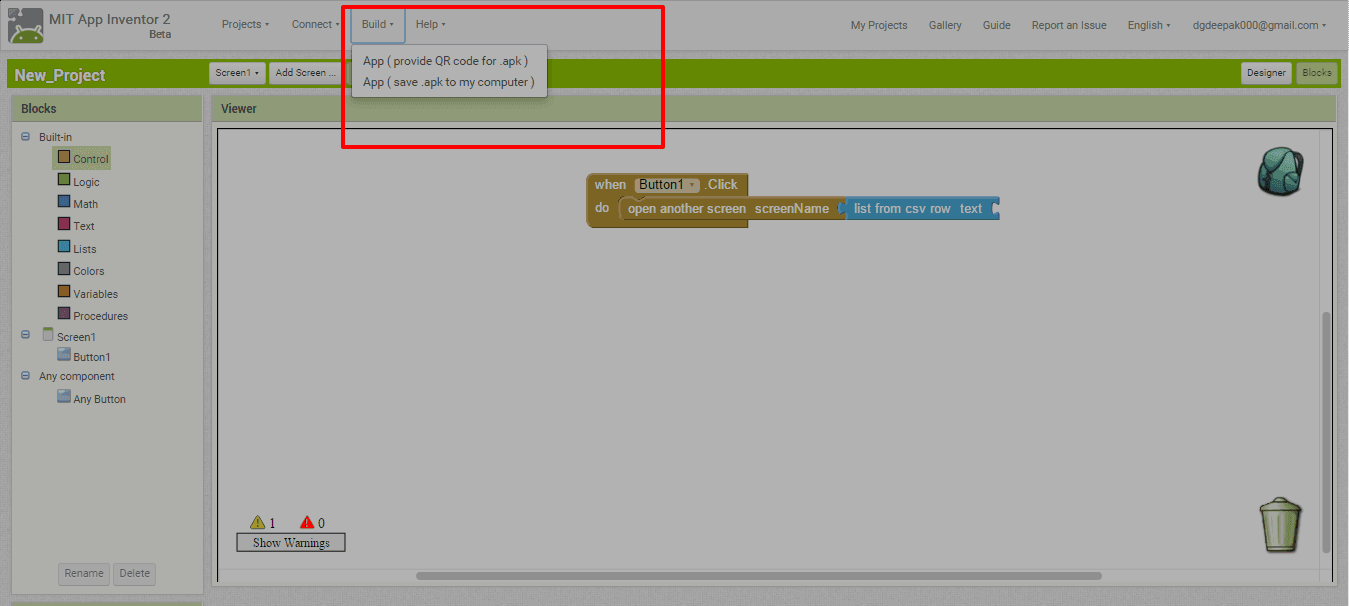
The blocks editor has three tabs on the left labelled “Built-In”, “Screen1” and “Any Component” where you choose blocks which you can drag onto the editor area which takes up most of the screen: here you can connect the blocks.
In the example below, connecting the “when Button1.Click do” block with the “open another screen” block results in a new screen containing a list, containing information ( it could be any information such list of members, items etc).
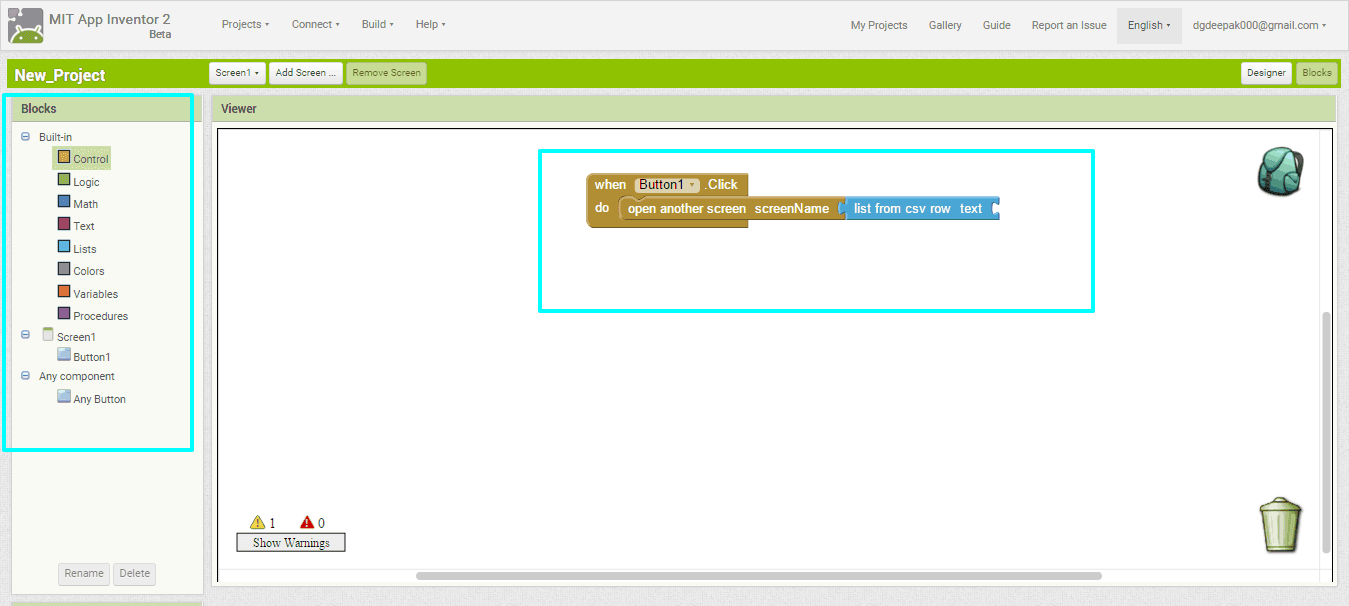
This example is from the most basic tutorial but the blocks interface allows for many more complex functions as you can keep connecting different blocks. Although MIT App Inventor is a “no coding” Android development tool, the blocks system is in fact a programming language.
You can declare variables, perform calculations and use logic such as “if” statements. But because it the blocks editor works in a visual way, by dragging and dropping elements, many people may find this a lot less intimidating than learning a programming language like Java.
Getting the Package
As mentioned earlier, the app is displayed on your phone (or the emulator) in real time. When you disconnect the phone however, the app will vanish. Of course you will want to use your app when the phone is not connected to you computer.
And most likely you want to share your apps with others… So the next step is making an .apk package of you app which can be distributed and installed on any Android device.
The “Build” button in the top left menu of the designer screen has two options: 1. App ( provide QR code for .apk ) to Generate a bar code that you can scan using a bar code scanner app to install the app on your phone and 2. App ( save .apk to my computer) to save .apk file to your PC or desktop.
In addition to downloading an .apk, you can also download the app’s source code. However, as this is not Java SDK code, it will only work inside App Inventor. This means that you can’t make changes to your project that are not supported by MIT App Inventor.
Because of this, you can’t do things like changing the author name or incorporating ads or an analytics tool for tracking views of the app’s pages. I did however find several tools online to decompile the source code to Java so may be able to circumvent these limitations.
I had a few more gripes with AI: the web viewer, an essential part in many apps, is not yet fully functional. For instance, it doesn’t support navigating to the previous page but instead pressing “back” will exit the app. Furthermore, there’s very limited control over the app’s layout. Where other app makers try to please customers with nice looking themes, menu’s and buttons, MIT App Inventor is truly geared towards functionality.
The components look very basic (actually, they’re kinda ugly)… but the choice of different components and the blocks editor make this a far more powerful tool for designing functionality than any online app maker I’ve seen until now!
Conclusion
MIT app inventor 2 is a very powerful tool that offers many options for app design that other products don’t. It is completely free, there are no ads or branding. AI is still in beta so we can expect further refinement and new features in the future.
On the flip side, this is not a simple template or wizard driven app maker. You will have to do some setup work before you get started with building your first app. Furthermore, the large choice of components and the huge amount of possibilities provided by the blocks editor mean that this is quite a complex product and there is a learning curve.
If you want to quickly build an app based on internet content, for instance to promote your business, App Inventor probably isn’t for you. However, if you have an idea for an app that involves more than just displaying online content or if you want to experiment with designing an app without actually having to write any code, then App Inventor is a great product with virtually limitless possibilities!


Thank you.
Could you elaborate pin the apps you found to convert the file to java?
Hi John, its little complicated process, you could visit here: http://goo.gl/m5WKak to know about these tools and how to use them.