You probably have some undeveloped film at home, just like me. You can probably still develop them. But finding a simple photo studio to do it would be a challenge, not to mention the price, which is definitely not the lowest one given the specifics of the service provided. The film would have been lying around dead in a drawer or on a shelf somewhere if not for a special Android app that allows you to digitize your photos with your phone in a matter of seconds.
The app I’m talking about is called FilmBox. It’s free by default, but there’s an option to subscribe for a fee and get an extended feature set. In fact, you don’t have to pay because the photo digitisation function works by default without any additional conditions. But there are one or two scenarios where a subscription is just a must for you. I’ll tell you about that below, and at the same time, I’ll tell you which plan is better.
How to digitize or develop film on your Android phone
Here’s how it works:
- Download the FilmBox app from Google Play here;
- Launch it and click “Skip” in the paid subscription stage;
- Open the app for access to the camera;
- On your computer, open photomyne.com/backlight (this is the highlighting of the desired tone);
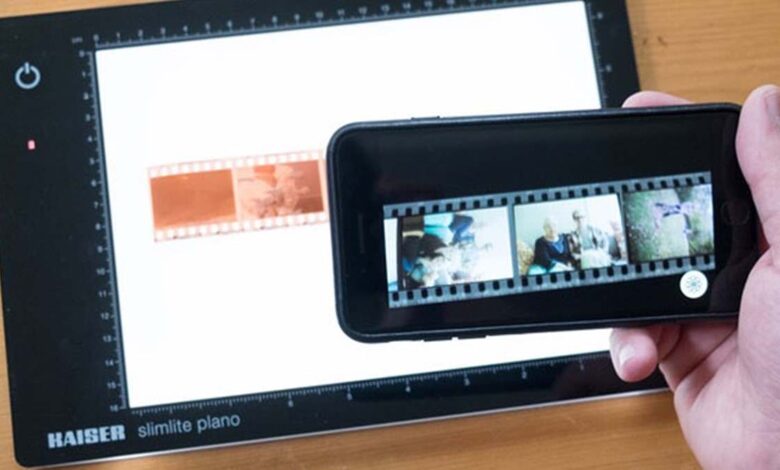
- Hold the film vertically to the screen at a distance of 4-5 cm and point the camera so that the perforation hits the lens;
- Press the shutter button for 3 seconds.
Although film scanning is available by default, the option to save digitised photos is only available in the paid version. I’m not usually in the habit of recommending that readers sign up for a paid plan, but in this case, if you have a large amount of footage that needs to be digitized, you can subscribe for a month for a few dollars, digitize whatever you need, upload the photos to the cloud, and then unsubscribe.
Here’s a video tutorial:
I am happy with the quality of film digitization. But keep in mind that it depends directly on several factors:
Firstly, you need the monitor on which you turn on photomyne.com, which highlights the film, to have high resolution. My MacBook Air with its HD resolution is not the best for this. So I got out of the situation by using an iPad with a Retina screen.
Secondly, the better the camera of your smartphone, the sharper and more contrast the final picture will be. Curious point: the lower the resolution in which the picture is taken, the better the final result (12 MP camera doesn’t capture the screen’s grid, while 48 MP camera does).
Thirdly, dark photos, or light photos against a dark background, lend themselves best to digitisation. I don’t know what this has to do with it, but all the sunny shots I tried to digitize invariably turned out to be fainter than night shots. So keep that in mind.
Also see:
Developing film with your phone
In general, the app does surprisingly well in digitizing old film. Even light-toned photos appear slightly more vintage than they really are. You can digitize any kind of film, be it colour or black and white. In that case, the app has a colouring function. So if you can find an old B&W film, you can get a digital copy of it and try colouring it as well.
Before I tried scanning the film, I thought the app would lie in colour reproduction. After all, it was strange to me that a regular smartphone camera would be able to recognise colours captured by a film camera. However, I was wrong. The output showed all the colours in the picture exactly as they were captured. I can see this in a direct comparison with the developed photos, so the FilmBox app is a big plus from me.


I was able to catch my cheating husband red handed with a lady he has been having a love affair with and this was made possible by Fred hacker that I met through a comment posted by Kimberly Jane on Reddit about his good and professional services. I started getting suspicious of my husband since he became too possessive of his phone which wasn’t the way he did prior before now. He used to be very carefree when it comes to his phone. but now he’s become obsessed and overtly possessive. I knew something was wrong somewhere which was why i did my search for a professional hacker online and contacted the hacker for help so he could penetrate his phone remotely and grant me access to his phones operating system, he got the job done perfectly without my husband knowing about it although it came quite expensive more than i thought of.i was marveled at the atrocities my husband has been committing. Apparently he is a chronic cheat and never really ended things with his ex.. contact him here. fredvalcyberghost@gmail.com and you can text,call and WhatSapp him on +15177981808
My husband has been frequently deleting all messages for the last couple of days from his phone and he didn’t know i was peeping at him, then i asked him why he was deleting all messages from his phone but he claimed that his phone memory was full and needed more space. Immediately I went in search of a hacker who can get me deleted information and contents from my husband’s phone and luckily for me i came across this reputable ethical hacker Mr Fred, this hacker got the job done for me and provided me with results and i saw that my husband has been lying to me. He was simply deleting all pictures, call logs, chats and text messages between him and his secret lover so i wont get to see what he has been doing at my back. Thank God for reputable hackers who are ready to help. I must say am really impressed with the services i got from The hacker Detective and am here to say a very big thank you: contact him on fredvalcyberghost@gmail.com and you can text,call him on +15177981808 and on +19782951763