It won’t be wrong if we say that in the current state of technology, we rely on the mobile phones most of the time, and thus, that makes us save our most of the data onto them. And that makes the risk of loosing it as well. For such instances where we find our self losing precious data such as message, document files, images, videos, etc., Or concerned about the stored data, it would be good a idea to use a data recovery software. The EaseUS MobiSaver software comes handy in such cases. EaseUS MobiSaver has complete, easy to use suit that allows Android user to recover lost files from phones, make a backup or vise versa. We have thoroughly tested this piece of software, and we would love sharing about this recovery tool through this review.
No matter what happened to your phone that caused lost of files, MobiSaver is capable of recovering most of them. Whether you have accidentally deleted the files, lost data after rooting or phone got bricked, they all can be recovered with this recovery tool. Especially for Android users, they often try to root, or install a custom rom, and eventually lose their stored data, this tool would be a life savior. The main aspect of any software or data recovery tool is the interface. The EaseUS MobiSaver has been designed very simple, the user interface is very easy to understand, and use.
The recovery process is quite simple, and takes less time as well. The recovery process, and user-interface is somewhat similar to other tools, we had reviewed in past time. The EaseUS MobiSaver comes with paid, and trial version. The best way to test this software is to use it’s a free trail version that allows to try it’s most of the features. The paid version is somewhat very affordable, and cheap if compare to other rivals that do the same thing, and in almost the same manner. Let’s get into features that we liked most about it,
User-Interface
As far as you are concerned about the ease of use, the EaseUS MobiSaver sure comes handy. The user interface remains simple at all of the stages.
Ease of Use
Well, it matters the most. The recovery process is very simple. The user just needs to connect the device through USB cable. The recovery tool will own detect the device, analyze it, and present all the files/lost ones, that can be recovered that instance.
Usefulness
No matter how did you end up loosing your precious data, they all can be recovered with this utility. It can bring back most of the files including messages, images, contacts, videos, applications, and documents. For root users, it becomes even more useful, and recovery process becomes more intense.
For contacts, and messages, they can be exported in multiple formats such as CSV, HTML and VCF formats and messages in HTML format.
Before recovery, each and every file can be previewed, and then selectively proceed further to recover, and save them to onto a PC.
How Does It Work?
As we told you earlier, the recovery process is quite simple. By just a few steps, the deleted/lost files can be recovered easily.
The setup is quite easy, you can download the free version of it from →here or go for paid version from →here. Once you get it, just install it just like you do with other software. That’s it. You’re ready to use this recovery too.
Here’s how the recovery process works,

Step 1: Establish Connection
First, you’ll need to connect your device your laptop. You need to make sure that you’ve already installed the proper drivers over it. Most importantly, user needs to enable USB mass storage option, so proper connection can be established between the device, and EaseUS MobiSaver.
There is only one way to connect the device, the USB cable. While connecting the device, we found few failed attempts.
Once your device is connected, you’re ready to go further.

Step 2: Scanning Process and Preview
EaseUS MobiSaver automates the process of scanning the device as you connect, you it to PC. This tool thoroughly scans the entire Android phone, and locate the deleted files.
As soon as the scan process gets finished, it compiles a list of files, sorted in an appropriate manner. The user can preview these files before bringing back. Depending upon the phone, and storage, the scan process may take between 2-10 mins to retrieve these files from the phone.
All the recoverable files, messages, contacts, music, videos, etc., Will be listed in a categorized manner. That helps to locate, and preview required lost files easily.
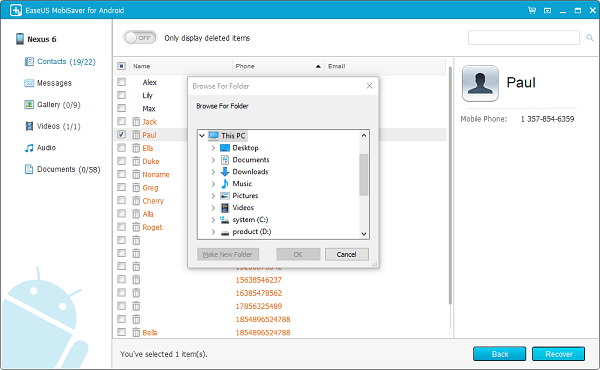
Step 3: Recover Lost Files from phone
Once you’ve done with the scanning process, and thoroughly reviewed the lost files, now the time is recover them all. Just select the files from the list, and hit the recover button, as shown in the above image. A new window will be opened.
That window allows to select the output location, and the selected files will be stored there. That’s just all.
Wrap Up
EaseUS MobiSaver is easy to use, and it does a good job when we need to recover deleted or lost files from an Android powered smart phones. This recovery tool works on all Windows operating systems, and there is a separate edition for Mac user as well.
If you have been looking for such software, there is no doubt that EaseUS MobiSaver worth a try. The trail version is good to get started with it, and paid version is quite affordable. Though, it lacks multiple connectivity features as we see on other similar softwares, but the price point won’t let you down.