The Android 8.0 Oreo update is being delivered to all unlocked Samsung Galaxy A5 2017 devices across Europe. However, it might take several months to reach all of the devices. If you don’t want to wait for that Over-the-air notification (OTA) and want to update your phone right away then the tutorial is what you need. In this guide, we’ll help you to update your Samsung Galaxy A5 to latest Android 8.0 Oreo officially. Since most of the OEMs rollout updates stack-wise based on regions, it can take anywhere from a few weeks to several months to reach all of the users.
There are many benefits of updating the firmware. Most likely the user-interface will better and there will more customization options. Another thing that we expect is better performance. The latest Android 8.0 Oreo firmware will bring better opportunities to use your phone. It has many improvements and enhancements to existing Android features. And several new features. Overall, this update worth your time. For you to install Android 8.0 Oreo firmware on Samsung Galaxy A5, you will have to make use an Odin flashing software.
Since Samsung has already started pushing this new update, you can manually update your phone. The updating process is almost similar to what we do while flashing the stock firmware. In this case, we’ll flash the freshly rolled out update file through Odin. This update is being rolled out to users, however, but not all the users are getting it at the time. Certainly, updating it manually will be an ideal way, if one doesn’t want to wait longer. It doesn’t include any kind of technical knowledge or skill. We have detailed each and every step that you need to update your Samsung Galaxy A5 to latest Android software.
The update process requires your proper attention. We have detailed everything important in this process. Since we are manually updating the phone, it is highly recommended to create a backup. Things like messages, contacts, photos, and videos – can be backup easily. There is an application called Samsung Smart Switch. This application makes easier to backup/sync devices. To learn more about this app and procedure, follow our — Backup guide for Samsung devices. That will fairly take several minutes to complete.
Before we begin the process, below are some important prerequisites that you must follow. Read all lines we mentioned below thoroughly and prepare accordingly:
- This tutorial works only on Unlocked Samsung Galaxy A5 devices ( there shouldn’t be any carrier boundation like AT&T, Verizon, etc). It has to be checked that the device’s model should be SM – A520F.
- You shouldn’t implement this tutorial on any other smartphone. That can create certain huge problems.
- If you’ve rooted your phone, then still you can update it, but root access will be removed post installation.
- If you’re using a custom Rom, then a factory reset is required after the installation of this update. Kindly note, that will empty your device completely. Make sure to backup important stuff before doing so.
Must read all the prerequisites we mention above. If you’re being dicey about whether to update manually or not, we suggest you wait for the official update. That will more comfortable for you.
If you want to update manually, then keep reading below. To make things simple for you, we have managed to compile this update in a single .zip file. That we are going to flash on Galaxy A5 and update it to the latest Android 8.0 Oreo software.
How to Install Android 8.0.0 Oreo Official Update for 2017 Samsung Galaxy A5
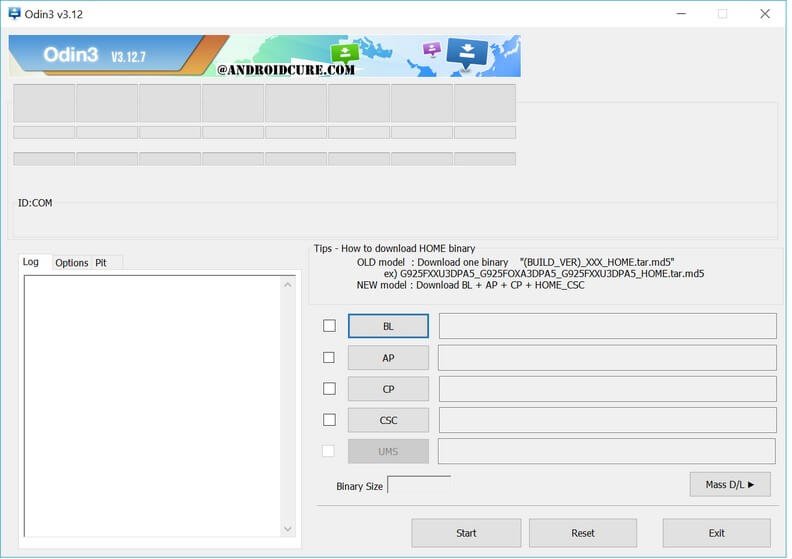
- Download the Odin flashing tool from →here. Extract the content of the zip file to obtain the .exe file. This tool is widely used to update the firmware on Samsung’s devices. This tool has an extensive set of options that help to maintain the Samsung’s devices.
- The update file – download the Android 8.0 update file for Galaxy A5 from →here. Extract the content of the zip file to obtain the following files on your computer:
- BL_A520FXXU4CRD5 tar.md5
- AP_A520FXXU4CRD5 tar.md5
- CP_A520FXXU4CRD5 tar.md5
- HOME_CSC_A520FXXU4CRD5 tar.md5
- Now, from the extracted folder of Odin program, run the EXE file to open the Odin program. It looks like below:

- Now, turn off your phone using the power button.
- Then boot into the Download mode – press and hold Volume Down, Home and Power buttons together till Samsung’s logo appears on the screen. Then release the buttons. You should be in Download mode now.
- Using a USB cable, connect your phone to the computer. The Odin program will detect your phone. The ID:COM section will turn to blue.
- Now, you’re ready to flash the update files. Now perform followings:
- Tap on BP button and upload ‘BL_A520FXXU4CRD5 tar.md5‘ file from the extracted firmware folder.
- Similarly, tap on AP button and AP_A520FXXU4CRD5 tar.md5
- Then load CP_A520FXXU4CRD5 tar.md5
- and finally, load HOME_CSC_A520FXXU4CRD5 tar.md5 (Make sure to load these files correctly.
- Now, you can start the process. Tap on Start button present at the bottom.
- It can take several minutes to complete. Once it gets completed, the Odin tool will display a PASS message.
- Now, take off your phone.
Your phone then reboots and bring you to the latest interface soon. For the first boot up after the installation, it can take up to 10 minutes. So have patience while it turns ON.
Troubleshooting
Though there shouldn’t any issues post installation. However, in case you observe that the device is not booting up, or stuck at the boot screen, then perform following troubleshooting steps to remove those errors.
- Turn off your phone.
- Then boot into the recovery mode – press and hold Volume Up, Home and Power buttons together. You should be in the recovery menu.
- Under this menu perform – “wipe data/factory reset“.
- Reboot your phone.
Remember that it will wipe your phone completely to remove these errors and bugs. Now, your phone should boot normally. Enjoy the goodness of Android 8.0 on your phone.
That ends our tutorial here and we hope that our readers would find it useful. If it does help you or have any concern, make sure to comment below.


thats 7.0 not 8.0 !!!!!
Is there a way to take a backup of some sort before engaging in this ? just in case the whole thing fails