How to deactivate Google Assistant is something that many users are constantly asking themselves, as they consider it to be an unhelpful or annoying application. Although it is an excellent tool for quick voice commands, it also consumes a lot of data if you are not connected to a wireless network. That’s why, in the following text, we explain how to disable it on your device, quickly and easily.
Now, even if Google Assistant is disabled, it is still available to be activated any time you press and hold the “Home” button on your smartphone. So, here’s how to disable it completely on Android OS devices. Also, in case it is associated with any device on Google Home, you will also learn how to disable this feature.
How to deactivate Google Assistant on your Mobile or Tablet
To disable Google Assistant, you need to enter the options menu. However, this is not something that is visible to the naked eye on the device, so you will need to follow the instructions below to do this:
- Press and hold the “Home” button and say “Open Assistant settings”.
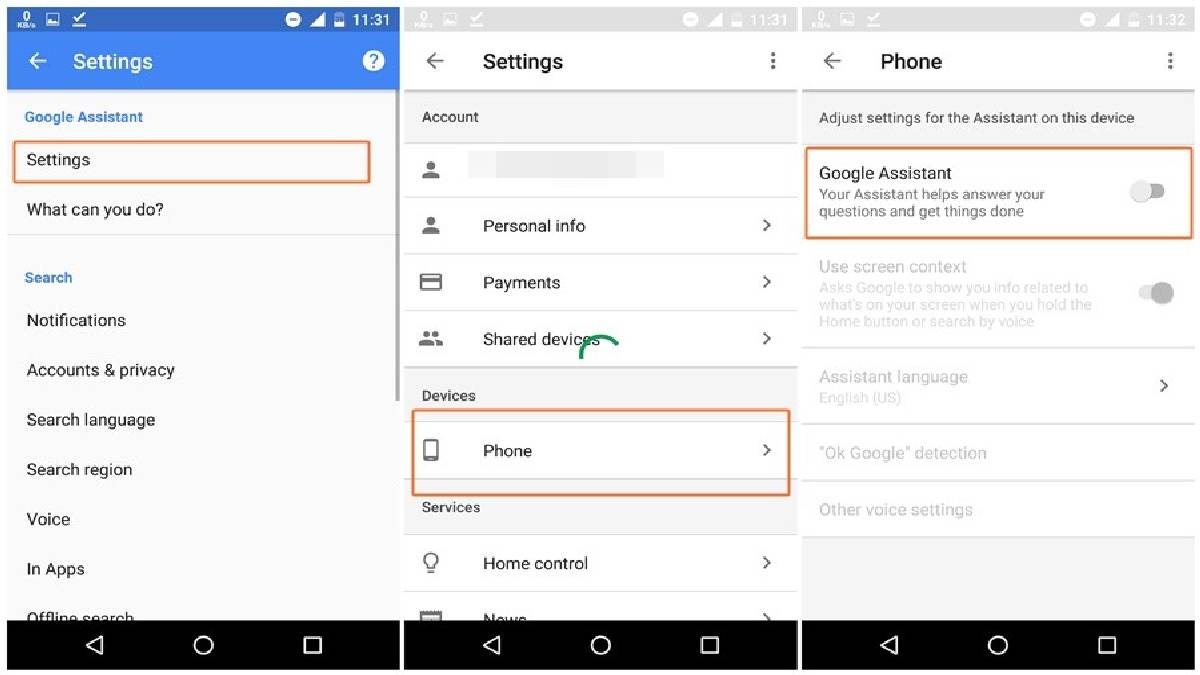
- Click on the “Assistant” tab.
- Scroll to the bottom to find the Assistant devices and click on “Phone”.
- Turn off the “Google Assistant” toggle.
In this simple way, you will be able to deactivate Google Assistant in a couple of minutes. However, keep in mind that you will need an Internet connection to do this. On the other hand, this function will still be available to be reactivated at any time you want. So, in case you want to completely remove this possibility, you should read on.
Also see:
Disable activation – completely disable Google Assistant
To completely disable Google Assistant and prevent it from being activated again at any time, you will need to access the settings menu on your smartphone. Afterward, you will need to follow the steps described below. It is important to clarify that the route or options may vary for each device, depending on its Android version, model or brand.
- Go to “General Settings”.
- Locate the “Applications” section and tap on it.
- Tap on “Advanced options”.
- Select “Default application settings”.
- Now tap on “Voice input and assistant”.
- Tap on “Assistant application”.
- In the pop-up window that will appear, select “None”.
This will completely disable the activation of the Google Assistant and it will not appear, even if you press and hold the “Home” button. It is important to note that this can be reversed at any time by simply repeating the process in reverse, i.e. instead of selecting “None” you should choose “Google”.
Deactivate on Google Home devices
If you have a smart home device that is linked to Google Home, you may want to disable the Voice Assistant there as well. However, you should know that this cannot be done permanently on this type of device, but you will be able to schedule the deactivation at certain times of the day through the “Inactivity” function. Learn how to do this below:
- Open Google Home on your device.
- Tap on “Home”.
- Select the device on which you want to apply the changes.
- Tap on the Settings icon (the gear).
- Go to Digital Wellbeing > New Schedule.
- Select the devices you want to apply it to and press “Next”.
- Choose a schedule or create your own based on your daily routine and press “Next”.
- Set the start time and end time of the Wizard’s inactivity. Then press “Next”.
- Press “Done”.
Your devices will now be scheduled and the Assistant will automatically turn off, in the range of hours and days you chose during the process. In case you change your mind, you can revert all the changes you made by following the same route but removing the inactivity.
As you can see, deactivating Google Assistant is very easy and quick, as is disabling the Google Assistant activation button. Just follow the steps mentioned throughout this text and you will be able to do it successfully.
Also see: