Recently, Samsung rolled-out an Android 7.0 update for the Samsung Galaxy On7 Pro, and it resulted many users experienced performance bugs. Out of the box, this smartphone was super pocket friendly, and has decent hardware specification. If you’ve bricked down your phone, and looking to resolve it, this article should help you. In this guide, we’ll help you to unbrick / repair Samsung Galaxy On7 Pro through different methods; factory reset, clear cache, and putting the stock firmware.
The Samsung’s smartphones have been ideal for developers to develop, and test new applications, custom Roms, mods, and so on. So, you might have bricked your phone posting install a new custom Rom, or application. That’s the most common reason of getting bricked. In that regard, we have this tutorial. We’ll learn different troubleshooting methods to manage to bricked Samsung Galaxy On7 Pro, and make it work again. If such things happen, one should try to resolve it through common troubleshooting instead of stepping to complex one.
Since, there could be many reasons causing a problem on your phone. Sometimes, just resetting, does the job, and brings the phone back to its working condition. If you’re running out of performance, facing minor issues, lags, etc., than you should start troubleshooting with a factory reset. However, you must be aware that such actions would wipe out your phone. Means, everything that you’ve downloaded so far, installed apps, and game, etc., would be deleted. So, make sure that you backup your phone — best Android backup solutions. That would be more suitable, and safe way to move on, and take further actions.
If that doesn’t work, one can turn up to clearing the device cache memory. The cache memory keeps on accumulating as we use our smartphone. As long we use our smartphone, the size of this memory will keep increase. And eventually, it causes some serious performance issues. So, one should clear this memory once at lest in two months. That keeps the phone running smooth all the time. If you’re facing performance related issues, lags, and app crashes, then we recommend this action. Either you can clear the cache of a particular, or all at once.
The final thing that will definitely sort out any issue related to the software is flashing the stock firmware. This will reduce down all the changes to default settings, apps, and delete all the installed, and downloaded stuff. We should use this option when nothing works. It will downgrade your Samsung Galaxy On7 Pro to its native state — like factory fresh piece. We have all these methods discussed within this tutorial. That should help you to recover your phone from dead condition, and make it work just like it was before. Let’s get going with the first troubleshooting method:
1. Perform a factory reset
It helped a lot, and much easier to perform. Performing a factory reset will turn the default settings on, and remove all the third-party applications. Moreover, it removes all the changes, and files stored on your devices’ internal memory.
When to perform a factory reset? It’s an inbuilt troubleshooting tool intended to keep the phone running smoother post removing third-party apps, and custom settings. If you’ve recently changed settings, or loaded your phone with tons of applications, resulting unknown bugs, crashes, and stability issues, performing a factory reset would the ideal choice. If you want to speed up your phone, then must follow our guide:
And if you’re using your phone for a long time, and facing serious performance issues, then having this troubleshooting performed, would resolve the issues.
—How to
- Tap on Settings
- Scroll down and locate “Backup and reset” — tap on this option
- At the bottom, tap on “factory data reset” (or Reset Device), and tap on it.
- Follow the on-screen instructions to reset your phone.
Once your phone turns up, you’ll see a completely fresh, and a new home screen. Start by setting up a Google account, and further details.
That’s how, you can perform a factory reset on your phone anytime you want. It helps to remove minor, and some major issues from the device.
After performing this reset, we hope that you’ll see an improvement on your Samsung Galaxy On7 Pro. If not, perform the below troubleshooting.
2. Clear the cache memory
It impacts the performance most. If you’re only facing performance related issues, then you should perform this action. Clearing cache memory on Samsung Galaxy On7 Pro would give great relief to your phone.
Since, it keeps accumulating throughout the time, it certainly grabs a huge amount of internal memory. And that eventually causes following problems:
- Low performance (lags while you navigate, open apps, switch, open documents, and so on)
- Stability issues
- High response time
- App crashes
- And of course, low storage space
It is recommended that users should clear the cache memory at lest once in two months. Here is how you can clear cache on Samsung Galaxy On7 Pro:
—How to
- Turn off your phone.
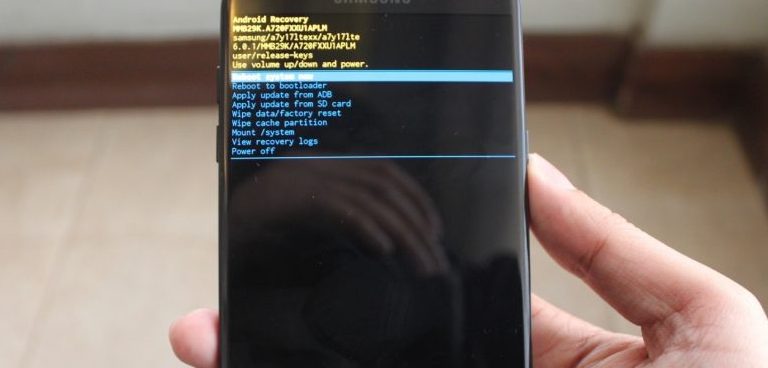
- Reboot into the recovery mode — press, and hold the Power, Home, and Volume buttons all together until your device boot into the recovery mode.
- Under the recovery mode, select “wipe cache partition” using the Volume buttons, and perform this action.
- Follow the on-screen instructions to perform this action.
- Exist the recovery mode – tap on reboot system now.
It won’t hurt your files stored under the internal memory. It only deletes the cache partition of your phone.
All the existing issues should have been now removed. Also, you’ll notice that good of amount of internal memory is free to use.
Also, you can perform the for individual apps through Settings->Apps-Clear app cache. We hope that we are going good far.
If you still find that nothing seems to work for you, then downgrading your phone should work. Before doing so, we recommend to backup your phone.
3. Flashing stock firmware on Samsung Galaxy On7 Pro to unbrick it
It is one of the most helpful methods to revive the dead handset. Until the problem is related to the software, it can be cured through these troubleshooting that we mentioned. Including this as well.
If you figure that problem doesn’t relate to the software — the Android OS, then you must take it to the nearest service center. Before stepping to downgrade the Samsung Galaxy On7 Pro to stock firmware, read below requirements:
- You need a Windows-based computer with an internet connection.
- Download, and install the USB drivers for Samsung Galaxy On7 Pro on your computer from →here. So, you don’t face any connectivity problem.
- Download the flashing tool — Odin tool from →here. Extract the content of this compressed file. The Odin tool helps to flash firmware on Samsung devices.
- Get the latest stock firmware for Samsung Galaxy On7 Pro from →here. Extract the content of this compressed to obtain .md5 file (firmware file).
How to Unbrick the Samsung Galaxy On7 Pro
- From the extracted folder of Odin tool, tap on Odin.exe file to run the application. It looks like below:

- Now, turn off your phone, and boot into the download mode — Press, and hold Volume Down, Home, and Power buttons until you get into the download mode.
- Now, through a USB cable connect your phone to the computer.
- The ID:COM section shall turn to blue to once your phone is connected. If that doesn’t happen, try to re-install the USB driver, restart your computer, and repeat above steps.
- Now, tap on ‘AP button’, and select the firmware file (.md5 file), and do not make further changes.
- Tap on ‘Start’ button to begin the process, and wait till it gets completed.
- Once you finish with the process, take off your phone.

For the very first boot up, your phone might take some time. Don’t get yourself worried. It is completely natural, and happens most of the time.
These are the steps to execute to unbrick your Samsung Galaxy On7 Pro using the stock firmware. Now, your phone should be normal as it was before. We hope that this would help users to revive their smartphones from bad conditions.
If it does help you, don’t forget to share your experience in the comment section. Stay connected with us more useful tutorials, and tips!