
The cache memory keeps on growing and accumulate each time we hit an application, and certainly, sooner, or later, it will cause performance issues. This is the definite guide on how to clear/delete the cache memory on Samsung Galaxy S9 and S9+ completely for better performance, and user experience. Since, cache memory is associated with installed applications, we’ll learn how to clear cache of certain or all applications, and wipe out the entire cache partition.
If your phone has started to run low, or you’re experiencing performance issues, app crashes, unusual actions, etc., you might just need to delete the cache of your phone. That will settle down the existing issues related to performance, and improve the user experience. While using a smartphone, the user experience aspect should be good, and merely that satisfies the user. And as we use our smartphone, like Samsung Galaxy S9 and S9 Plus, they have tendency to become slower, and experience other performance issue.
The most common reason that we usually found is the cache memory. If you’ve been experiencing performance related issues, or some bothering ones, you should start the treatment with clearing the cache memory first. That way, you safely recover your Samsung Galaxy S9 and S9+ from daunting issues. There is no way that we can put a stop on cache memory. Each time we open an application, some amount of information/data is gathered in the internal/external memory. That turns to trash once we exit that application. And most of its’ part remains in the memory until we manually flush it.
Many Android OS specialists suggest to delete all cache files once in 3-4 months. Not only it does improve performance, certainly it will free up the good amount of internal/external memory. That was being used by trash cache memory. So, deleting the cache memory on Samsung Galaxy S9 and S9 Plus will bring out the good amount of memory that you can use to store other important stuff. In this guide, we cover different approaches to clear cache memory related to apps, and services.
The required settings exist in an Android Operating system carry out this task. Either, you can delete cache files related to a particular app, or delete all cache data at once. Unlike the factory reset, clearing cache won’t delete the installed applications, and stored files. It only deletes the corresponding cache memory. However, we still recommend you to back up everything that is important to you. Follow our below guides to back up your phone:
- The best backup solution for Android phones
- How to back up Android apps/games with data without root
When to clear cache memory?
Well, we have discussed it already. Lets’ discuss it a little bit more. Since, cache memory keeps on accumulating files/data throughout the time we run applications, it continuously grabs a huge amount of memory. That most the files/data kept unused/un-deleted from that memory.
That leads to many issues related to performance. You might face some below common issues:
- Dip in performance
- Several issues related to apps: app crashes, not responding, force close, GPS not working, etc
- Sometimes, it can cause serious issues like; unusual restarts/boots, freezing, etc.,
Even there are more.
So, if you’re facing any of them, or something related, you might need to clear the cache memory on your phone. That will fix these issues without loosing files, and stored data.

![]()
How to clear cache on Samsung Galaxy S9 and S9+
Either you can clear the cache memory of a particular application, or wipe out all at once. If you’re facing issues with a particular application, we suggest to clear its cache.
Part 1: How to Clear App Cache
1. Tap on Settings icon.
2. Tap on Apps
3. Now pick the app that you like to clear off the cache memory.

4. Then tap on Storage.
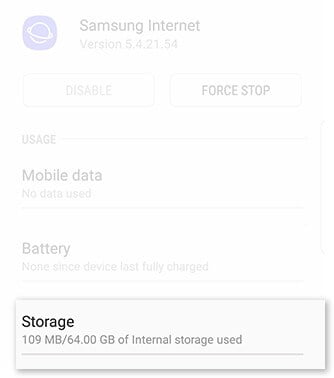
5. Tap on Clear Cache, and perform this action.
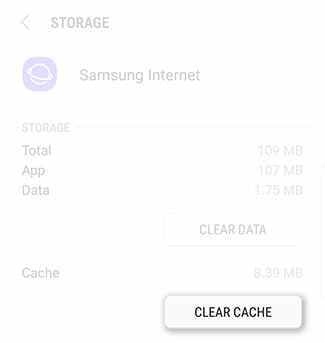
Image credits: Samsung
This deletes the cache memory related to that particular application. Additionally, to free up more space, you perform Clear Data. It will clear all the data related to an application.
If you wish to delete cache memory of all the applications at once, follow the below steps:
1. Tap on Settings.
2. Navigate to Storage.
3. Tap on Cached Data, and confirm your action to clear all cache data on the Samsung Galaxy S9 and S9 Plus.
This action will delete all the cache files/data associated with the application installed on your phone. It won’t hurt your apps in any way.
This action should bring good amount of memory, and improve performance of your phone. If you were facing freezing, low performance, or similar issues, they should have been fixed now.
For advanced users, there is one more way to get rid of cache memory. By wiping out the cache partition, you make sure the each drop of cache memory is removed from your phone.
If you’re serious about performance, then you must checkout our tutorial about Developer Options, and how to improve performance using it:
Read our second part to know about this action, and how to perform it.
Part 2: Wipe out cache partition on the Samsung Galaxy S9 and S9 Plus
This mode is more likely to be used by Advanced users. It wipes out the complete cache partitions that include cache files of stock, and third party apps.
Since, it clears cache files related to stock apps/services, it might be more helpful in tuning the performance of your phone.
To perform this action, we use Recovery mode. This mode helps to carry out extensive actions like flashing firmware, mods, updating, factory reset, backup, and much more.
To learn more about this mode, and how to enter into the recovery mode on Samsung Galaxy S9 and S9 Plus, follow below guide:
This tutorial should help you to access this mode, and use it effectively on these two smartphones. Now, let’s learn how to clear cache partitions using recovery mode on the Samsung Galaxy S9 and S9 Plus.
1. Turn off your phone.
2. Boot into the recovery mode – follow the above tutorial.

3. Tap on Wipe cache partition, and confirm your action.
4. Tap on reboot system now to exit the recovery mode.
You’ve successfully cleared the cache partition on your phone. Now, it should run smoothly, bug-less, and perform better in all aspects.
Note:- Since, recovery mode has extensively power options. You shouldn’t use them unknowingly. That can damage your phone.
That is how you can clear cache on Samsung Galaxy S9 and S9 Plus. Both the methods are irreversible, once you perform this action, you can’t undo them. Please share your thoughts about this tutorial in our comment section.
Since both handsets are powerful, we recommend you try PSP games to enhance your gaming experience. You can play almost all PSP games using the PPSSPP emulator. Following guides will help you:
That ends our tutorial here, and we hope that it helps users to clear cache memory on their smartphones. Don’t forget to share this tutorial, comments, and subscribe us.


there is no Storage option in settings you numbskull
There are, but there is not a “Cached Data” section. The storage is part of “device maintenance”.
S9 and S9+ are one of the best smartphones on the market. This phone is basically manufactured by the Samsung. To delete the cache memory for every phone is very much important. So there are some steps also to be followed in the galaxy phone to delete the cache memory. Like first go to settings, the memory etc. So to know more can visit our site.