
There are many reasons to clear cache data on an Android smartphone. The most common reason is about performance issues. When it comes to maintaining, and calibrate the performance, clearing cache memory or reset comes first in our mind. Here in this tutorial, we gonna help you to deal with such issues, and let you know how we can clear/delete the cache on Samsung Galaxy S8 and S8+. In this tutorial, we show both, how one can clean app cache, and wipe the cache partition on the Samsung Galaxy S8/S8+.
If your device is running slow, having issues impacting performance, facing app crashes, unwanted restarts etc., Then deleting cache may help you out. Or simply, it is a good idea to delete the cache data since it keeps on growing, and eventually causes performance issues. Each time we hit an application (any), it creates some temporary data which get stored, and grabs some amount of memory. The memory can be device’s or external. For maintenance performance, we should get rid of such waste data.
Performance issues commonly occur in most of the Samsung’s Smartphones. As we use the smartphone, they tend to become slow, and show other performance issue.
The basic reason is cache memory. If you’ve been facing issues on Samsung Galaxy S8 and S8+, then clearing cache should help to good extent. Also see our →How to speed up Samsung Smartphones for faster performance.
The procedure is very simple to follow. However, once it is performed, it cannot be undone. Before proceeding any further, we recommend to apps’s/game’s data that you don’t wish to get wiped. To back up apps/games along with their data follow our guide – Backup Android Apps/Games with Data. That should help you. Without talking much more, lets get into the core part of this tutorial.
How to delete cache on the Samsung Galaxy S8 and S8+
There are several methods. If you’re facing issues with one particular application. The app is getting crashed each time you open it, get a freeze or similar issues. Then one should try to clear cache related to that application.
Also see:
- Best apps for Samsung Galaxy S8 and S8+
- Enter Download Mode/Recovery Mode on Samsung Galaxy S8 and S8+
- Enable Developer options on Samsung Galaxy S8 and S8+
Follow below guide on how doing it:
How to Clean App Cache on Samsung Galaxy S8 and S8+
- Open the app drawer
- Look for ‘Settings‘ and tap on it.
- Then Tap on Apps->App Manager
- Now, select the app you want to clear off the cache.
- Now tap on ‘Storage‘.
- And then tap on ‘CLEAR DATA‘ to clear its cache memory.
If you would like to perform this task for all installed applications, this can be done easily. Follow the below steps:
- From home, tap on ‘Apps‘.
- Tap on ‘Storage‘.
- Select the ‘Cached Data‘ and confirm it to clear entire cache on the Samsung Galaxy S8 and S8+.
That’s all. Each update brings improvement to an Android operating system, and it’s become even more suitable. That is the only reason why Android has become the top operating system for mobile/tablet devices.
Also see:
So that is how one can easily clear apps cache data for a particular app or clean cache related to all installed applications.
Not only it helps to fix many issues, it also helps to bring-out more storage space which was being used by the unused files. For maintenance purpose, all Android Gurus recommend to clean/reset the device once in two-three months.
If you to delete the entire cache of the Samsung Galaxy S8 and S8+, then follow the below steps. The procedure requires involvement of recovery mode. Probably, you’ve already heard about Recovery mode.
Basically, this mode helps to perform many useful tasks to an Android phone such as flashing a custom Rom, backup current OS, clean cache partition, and much more. Other side, wrong use of this mode can hurt your device to great extent. So, if you’re not aware about it in depth, then stay away from it. Anyway, let’s go ahead, and how we can delete the cache on Samsung Galaxy S8 and S8+ using recovery mode.
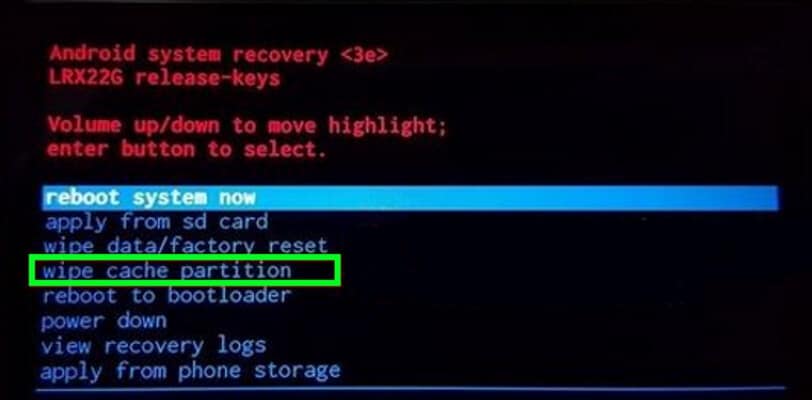
How to delete cache partition on the Samsung Galaxy S8 and S8+
Follow the below instructions to perform this action:
- Power off the device completely.
- →Boot Samsung Galaxy S8 or S8+ into recovery mode (follow the link for steps).
- Once you get into recovery mode, you’ll see the following screen containing similar options are a little bit different.

- To delete device cache, select “Wipe cache partition” from the list of options and confirm it.
- Wait until the process gets finished.
- Once it is completed, select ‘reboot system now’ to restart the device.
Man, you just made it. So in this way, one can easily delete the cache on Samsung Galaxy S8 and S8+. That only clears the cache files. That means, it won’t be erasing any of personal data such as downloaded files, images, songs, etc.
That should bring good improvements to your device in terms of performance, and stability. That’s all folks about this tutorial for these two smartphones.
If need any helps, make sure to drop your comment. Share, Comment, and Subscribe us!


As seems to always be the case- what you have described doesn’t exist on my phone. There is no settings tab in my ‘Apps’ drawer on my S8, nor storage.
I was wondering the same thing! I followed his direction but my menu must be different than his. Weird!
go to settings, device maintenance, and tap storage at the bottom screen, and u see three dot at top right, and click storage settings and find cached data, click that and clean
horrible tutorial, vaguely references things which don’t exist. The best tutorials tell you step by step what to click on. WTF is an app drawer and how to i get to it.
Hi Jordan,
App drawer simply means to an area where all of your apps are listed. Just Tap on Settings icon to get started!
If you open apps in settings it just shows all apps. Its like u would have to open each app. There is no “storage” to open
go to settings, device maintenance, and tap storage at the bottom screen, and u see three dot at top right, and click storage settings and fing cached data, click that and clean
#find