If you’ve bricked your phone, and want to revive it back, then this tutorial is going to help you a lot. Generally, we end-up having our phone bricked while we install custom firmware, recovery, or when we update it. In this tutorial, we help you to unbrick and repair Samsung Galaxy J7 Prime using the official stock firmware. We will reinstall the operating system in order to restore your phone to its fine working condition. Though, it’s a sure shot way to revive your phone, however it works till the problem it related to the operating system.
Somehow, if you’ve damaged the hardware aspects, you must take your phone to the nearest service center. Other than that, this post will fix almost bugs, and bricked condition. These days, custom Roms are getting very popular. Since, they offer better functionalities, features, and usability, more, and more users are intended to switch their native firmware with the custom one. Even, manufacturers like Mi, Oppo, etc., they keep their phones loaded with custom-touched the Android operating system; somewhat similar to custom Roms. If you’ve been stuck at boot-loops after trying installing a third-party Rom on your Samsung Galaxy J7 Prime, then must either try to flash it once again, or downgrade to the stock firmware.
This tutorial is dedicated to Samsung Galaxy J7 Prime users who are facing critical issues on their smartphone. Downgrading, or simply putting back stock firmware restores the device completely. It replaces all the third-arty apps, and firmware aspects with official firmware, and applications. And removes all the applications, documents, files, photos, videos, etc., being stored under the internal memory. So, we highly recommend you to back up all the important stuff before you step ahead, and flash stock firmware on your Galaxy J7 Prime.
Basically, while we repair or unbrick the smartphones, we usually reinstall the official stock firmware. In that way, it becomes sure that all the corrupt/infected files are replaced with fresh/stock files. If you’re facing serious issues like stuck at infinite boot-loops, unusual behavior, restarts, and similar issues, this tutorial would help you to recover. In order to achieve success at once, it’s highly recommended that you follow instructions exactly as we mention in this tutorial.
Since, we are up to flash the firmware on the phone, you must be aware with the risks involved, and other important aspects. You must back up all the important files before you proceed further. This process will wipe out your phone completely, and it is irreversible. Means, you can’t undo this process. Follow our; Android back up guide for Samsung smartphones. The method works flawlessly with Samsung smartphones;.
Most importantly, we dedicate this tutorial to Samsung Galaxy J7 Prime. You should not use this tutorial as a reference for any other smartphone. That can damage your phone to a greater extent, and can turn conditions even worse. So, make sure that you check the model number of your phone Settings->About phone-model number.
Must see:
- Best apps for Samsung Galaxy J7 Prime
- How to speed up Samsung Galaxy J7 Prime
- Best games for Samsung Galaxy J7 Prime
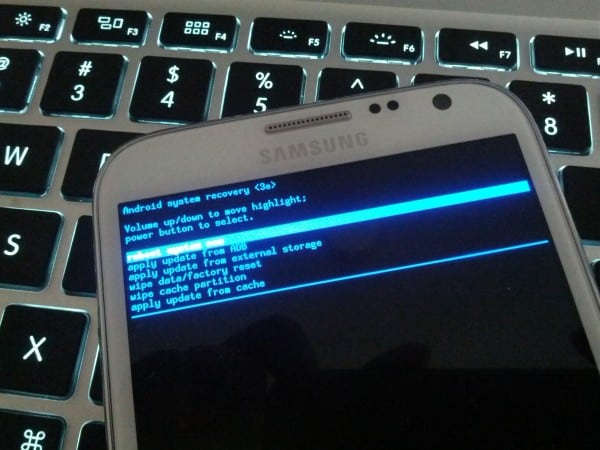
Since, the process will go through wiping your phone, all the stuff, including custom, and recovery, will replace with the stock ones. Means, if you’re using a custom firmware, it will be removed, and replaced with stock firmware. And other aspects as well. If possible, you can consider creating a Nandroid backup of your firmware. Just go into the recovery menu, and then using the Advanced options, you can do it.
We are almost finished with the prerequisites that we need. The last remains is battery power. Try to charge your phone at least 5o%, so it won’t die while performing this task. Also, you need a Windows running Laptop/Desktop with internet connectivity, and a USB cable. It is required to connect the phone to the PC, and establish a connection with between the two. Now, follow the below guide to unbrick/repair your Samsung Galaxy J7 Prime.
How to flash stock firmware on Samsung Galaxy J7 Prime
- Download the official stock firmware for Samsung Galaxy J7 Prime from →here. Make sure to download firmware based on your model, and region.
- Extract the firmware file to obtain .md5 file. We’ll use this file to repair your phone.
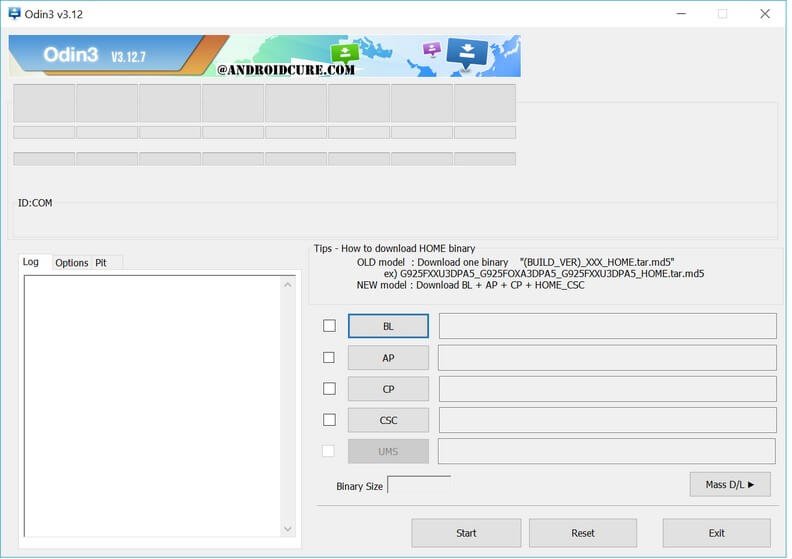
- Download, and extract Odin flashing tool from →here. Extract the zip to retrieve the Odin program.
- Now, Run the Odin flashing tool by tapping on Odin.ext file. The Odin program should open now:

- Now turn off your phone, and boot into the bootloader mode -> press and hold Power + Home + Volume down buttons till it boots into bootloader mode.
- Connect your phone to computer using a USB cable. The Odin program should detect your phone now.
- Now, tap on AP button, and load the firmware file .md5 file.
- Do not make further any changes. Now, tap on Start button to begin with flashing process. Once the process is completed, a Pass! message will appear.
- Take off your phone.
Now, your phone will restart, and boot to home screen soon. For the first start, your phone might take some time to start. It is completely natural, and you shouldn’t worry about it.
The conclusion
In this way, you can flash stock firmware on Samsung Galaxy J7 Prime, and revive it back from even worse conditions. Also, we suggest you to try performing hard reset before jumping to this option. Flashing stock firmware helps to unbrick smartphones easily.
That ends our tutorial here, and we hope that it helps our readers in fixing issues on their smartphone. If you’re facing kind of issue, make sure that you leave comments below.


There are 5 .tar files all are md5 type. Which one to chose?
md5 type
all are md5 type only
please help asap