
Launched in June 2015, the Samsung Galaxy J7 has been one of the most popular handset that comes with fabulous hardware and software specification under affordable budget. Currently, it ranks #1 position over GSMArena in term of popularity. Since Android is completely open source, individuals come up with their new creations, most of them are useful and sometimes they do hurt our handset too. Or there are many other cases we lost our device’s consciousness or simply, end up having bricked handset. Here have this tutorial, it helps to recover, repair or unbrick Samsung Galaxy J7 using the official stock firmware.
When it comes to bricked or if handset does not work properly, the ideal way is to try downgrading that device to its stock state using stock firmware. If you’ve got your Samsung Galaxy J7 bricked then this guide will surely help you recover it. We will use Samsung’s official firmware to unbrick Galaxy J7. As said above, there are numerous cases in which one can end up having bricked device. As soon as the problem is related to its software, there is no need to worry as it could be fixed, but if the problem is related to hardware then probably taking it to the nearest service center will be the best resolution to proceed.
This tutorial shows multiple methods, one is a soft reset, another is hard reset and last but life-savior, downgrading the device to stock firmware. Many problems such as performance related issues, stability, unusual behavior, etc., could be overcome through a soft reset /hard reset to the device. And in case of hard bricked, like phone is stuck, boot-loops, the phone is not turning ON or issue is not resolved even after trying these resets.
Then probably, downgrading the device to stock firmware will resolve the issue. And the same goes for Galaxy J7 to unbrick it too. If you see such kind of problem on your device, you could simply downgrade it to factory fresh piece.
Let’s do it!
Small issues such as performance, app crashes, stability issues, etc., could be resolved through soft reset. It resets the phone’s settings to default.
→Soft Reset
- Go to Settings option on your phone.
- Next, select Backup & Reset.
- At the bottom, you’ll get Factory data reset option.
- On the next screen, tap on Reset phone and confirm it.
Also read:
→Hard Reset
Instead, you could try a hard reset. In changes the settings and apps to default. Most of issues can be resolved through method.
This method includes recovery mode. Recovery mode is very convenient tool given to Android users, under you’ll several options can be used to flash ROMs, mods, back up and to reset an Android device too.
Here we go:
- Get into recovery mode. Follow these instructions here.
- Under recovery mode, locate “wipe data factory reset”.
- And press power button to select and then confirm your selection and it will reset your device to factory settings.
- Under Advance option, perform followings:
- Perform ‘wipe cache partition‘
- Perform ‘wipe dalvik cache‘.
- Then select “reboot system now” to restart your device.
Now your device should restart and run perfectly. If the problem still persists then you’ll must try downgrading the device to stock firmware.
Before we flash stock firmware over the Samsung Galaxy J7, you must read all the prerequisite mentioned below:
Prerequisite
- You should know that downgrading to stock firmware will lead to wipe out of entire phone’s memory. That means anything which is kept under the device’s memory will be deleted and it cannot be undo! If possible, try to save as much data you. You could follow our dedicated guides – How to back up Android device and Best Android backup solution.
- Also, if your device is having a custom recovery or Rom, it will be reverted to stock as well. Any changes or settings, will be changed to factory fresh settings.
- If rooted, the access will be revoked, which could be re-gain though.
- To proceed with downgrading process, you’ll need a Windows-based PC/Computer having internet connectivity and a USB cable.
Downloads
Download the firmware file from below links based on your device model number. You should make sure to check your device’s model number before downloading.
- Download firmware file for the Samsung Galaxy J7 from here. Put the device model number to locate and download the firmware file.
- Download firmware file for the Samsung Galaxy J7 (2016) from here. Put the device model number to locate and download the firmware file.
- Download firmware flashing software: Odin 3.0.9 from here and unzip it to your PC/ Computer.
- And make sure to install USB drivers of Samsung Galaxy J5 on your PC. Download them from here.
How to Unbrick / Downgrade Samsung Galaxy J7
- Power of your device.
- Now get into download mode. Press and hold ‘Volume Down, Home and Power buttons’ all together and release them when you see them Android Logo with Warning!
- Now press ‘Volume UP’ to get in to Download mode.
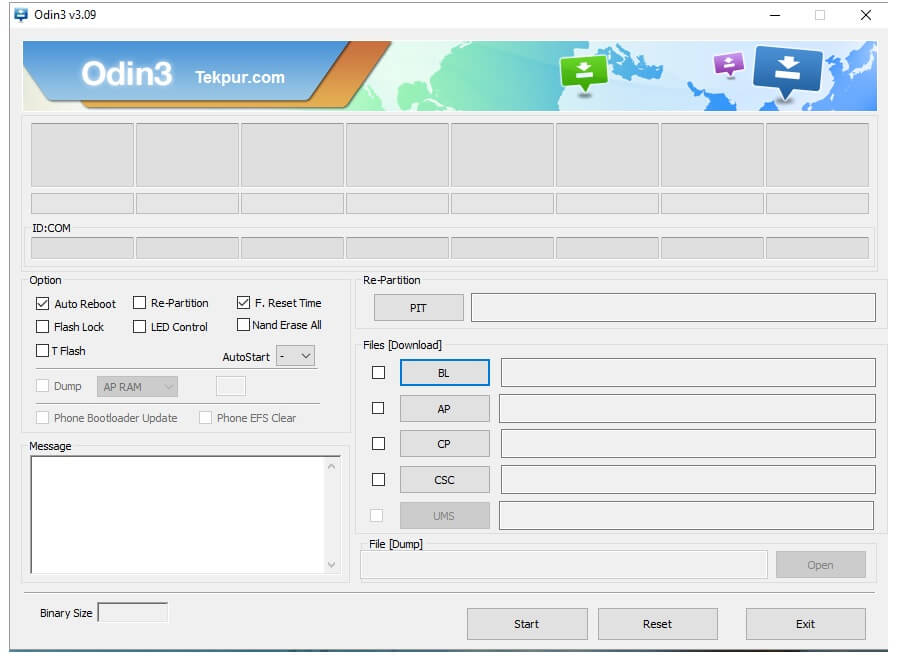
- Now head onto PC, from an extracted Odin folder, look for Odin3.0.9.exe file and run it. An Odin screen will appear just like below:

- Now connect your device to your PC using USB cable. Look at Odin program, the ID:Com section should turn to light blue. It indicates that the device has been connected successfully.
- Note: In case it does not turn to blue, make sure install USB drivers again on your PC and reconnect your device to PC
- Now under Odin program, Select “AP” and then find and locate .md5 file from the extracted folder of the downloaded firmware file.
- And don’t make any other change. Let the settings remain unchanged.
- Now, click on “Start” button and wait until Odin had done with the installation process.
- On success, Pass message will appear on Odin and your phone will be restarted. Detach your Galaxy J7 from the PC and you’re done!
That’s all folks. You have just downgraded the J7 to its stock state and now everything will replaced with the stock ones. So it ends out tutorial to unbrick Galaxy J7 through stock firmware. If you see any problem, just make a comment and we’ll surely help you out. Also check our → list of 50 best Android apps of 2016 year, Enjoy!


thanks for you tutorial!
Thank you for giving the information. It’ll help me lot.
Thank you, it worked!
You’re welcome!
What if my device wont even power on?