
Did you just brick your phone? Well, that happens even when we were not intended to do so. Till the issue is related to Android software, you can easily manage to repair it. If not, you must take your Samsung Galaxy S9 or S9 Plus, and go to a service center. In this tutorial, we’ll help you to unbrick or repair your Samsung Galaxy S9 or S9 Plus using the official stock firmware. It has been most preferred way of dealing bricked phones, corrupt operating system, any issue related to operating system, and so on. Though you might be trying it for the first time, but there’s nothing much more to worry about.
The process goes through a complete wipe out of your phone. So, if there is anything causing your Samsung Galaxy S9 or S9 Plus malfunction, would be eradicated. Moreover, it bumps up the perform the phone. If your phone is seriously going down in the terms of performance, and have already tried troubleshooting solutions(top solutions to resolve common issues), then you must proceed to reinstall its firmware. However, getting firmware reinstalled wipes out phone completely. So, you must backup all of your important files, folder, photos, and videos to somewhere safe place.
If you want to back up your phone, then we highly recommend you to check out backup guide: How to back up Samsung Galaxy S9 and S9 Plus. This guide helps to back up your phone through the official method. There could be many reasons for bricked phone. It can happen after you install an update, custom firmware, an application from Google Playstore, and so on. Minor bugs, and issues can be resolved through performing common troubleshooting. However, if the core part of an Android software is infected, then flashing the stock firmware would be the ideal solution.
It reverts the phone to its native position. Just like when you had it for the first time. If you’re using a custom Rom, or any sort of third-party utility, they all get replaced with stock aspects. You must be aware that once you perform this task, you cannot go back, or simply, undo it. The process is irreversible in nature. If you’ve bricked your Galaxy S9 or S9 Plus, then you must follow this tutorial to revive it back. This tutorial covers all important aspects regarding this procedure, and how to perform it.
And in any manner this doesn’t void the warranty terms. The method we mention here is completely safe to follow, and understand. In order to achieve success, you must follow the steps exactly as we mention in this guide. Thus, you must read all the steps thoroughly, and then only perform it. Read below prerequisites, and prepare your phone accordingly.
Prerequisites
- We dedicated this tutorial, and other aspects to Samsung Galaxy S9 and S9 smartphones. Do not use them on any other smartphone. That can turn conditions, even worse.
- As we have already discussed, this process wipes out the internal memory completely. It is recommended that you back up all the important stuff before you proceed any further.
- If you’re using a custom Rom/recovery, it will be replaced with stock firmware, and recovery. And other settings will turn to default setting. Once it starts running normally, you can make changes again.
- Certainly, root access gets removed. If you’ve rooted your phone, then this access will be removed, and afterwards, you may again proceed rooting your Galaxy S9 or S9 Plus.
- Charge your phone at lest 50%. It should stay on while we perform this action. If it dies in midst of the task, it can be harmful. Therefore, charge your phone to a good battery level.
Must see:
- Best applications for Samsung Galaxy S9 and S9 Plus
- Best games for Samsung Galaxy S9 and S9 Plus
- Enter recovery mode on Samsung Galaxy S9 and S9 Plus
Downloads
- Download the firmware file from any source that you like, or we’ll be updating firmware links soon. Extract the firmware .zip file on your computer to obtain .md5 file (the flashable file).
- Download the Odin flashing tool from →here. Extract the content of the file to your computer.
- Install the USB drivers for your computer. Download them from →here. USB drivers are necessary as they will help the device to connect the computer, and establish a proper connection.
That is all you need. Now, you’re ready to go ahead, and revive your smart phones from being bricked. Follow the below instructions, and make sure that you follow them in order.
How to flash stock firmware on Galaxy S9 and S9 Plus to unbrick/repair
Step 1. Turn off your phone using the power button.
Step 2. Now Press and hold ‘Volume Down, Home and Power buttons’ at once and release them when Android Logo appears on the screen.
Step 3. Then press ‘Volume UP’ to get in to Download mode. (Download mode – it helps to flash firmware on most of the Samsung’s devices)
Step 4. On your computer, open the Odin flashing tool folder, and run the Odin program. A following screen should appear:
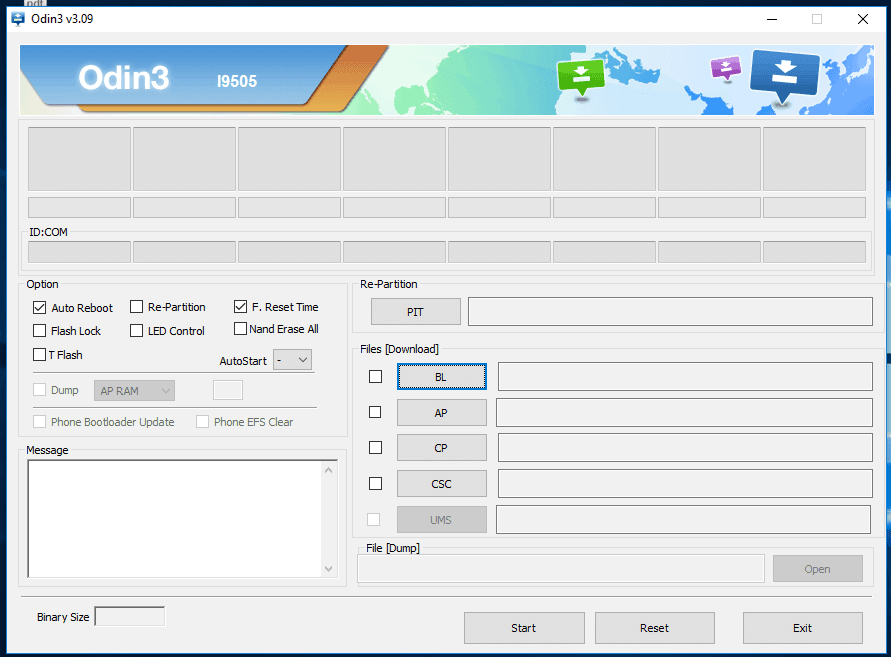
Step 5. Now, through a USB cable, connect your phone to PC. The Odin tool will recognize your phone, and ID:Com section will turn to blue color.
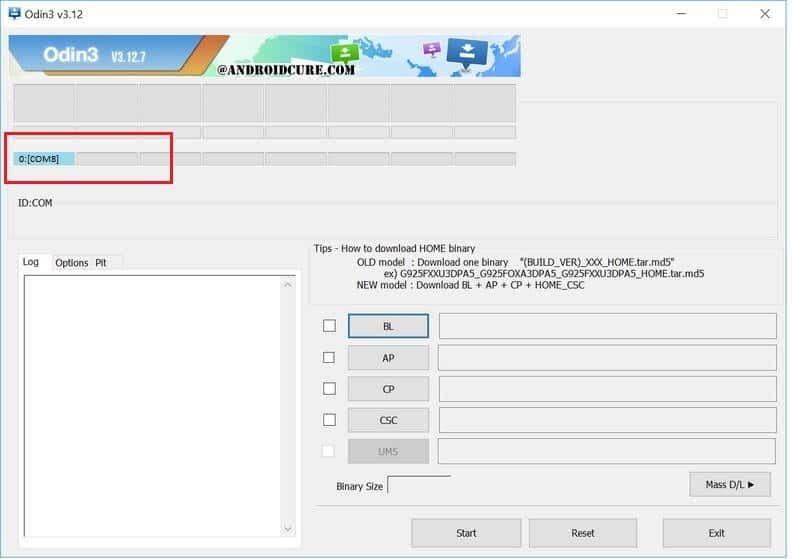
Note:- In case it doesn’t happen, try to re-install the USB drivers, and again follow above steps.
Step 6. Now, tap on AP button, and load the downloaded firmware file (.md5 file).
Step 7. To start the flashing process, tap on Start button, and wait till it gets completed. Once it is completely successful, a PASS! message should appear.
Step 8. Disconnect your phone from computer.
Now, your phone will reboot, and take you to home screen soon. Then, enter your account details to use your smartphone.
The Conclusion
That’s all you need to do when you end up with a bricked phone. Till the issues are related to the Android Operating system, you can manage to remove them. There are many cases where flashing stock firmware is found to be very helpful –
– extremely low performance, and troubleshooting solutions aren’t working
– unusual behavior, and unable to determine the cause of it
– stuck at Samsung logo/boot screen/ boot-loops
– App crashes/gray matter is infected
And so on. Now, you know how to manage these issues, and unbrick/repair Samsung Galaxy S9 or S9 Plus with stock firmware. Without worry much, now you can try as much as custom Rom, recovery, third-party applications, etc., And if something bad happens, just try out the troubleshooting solutions, and if nothing happens, then use this method.
We hope that this guide would help users who are facing serious issues on their smartphones. Most likely, they happen afterwards, we install custom firmware, or an application from other sources. If this post helps you, don’t forget to share your views, and thoughts in the comment section.